

TABLE OF CONTENTS
DOCUMENT APPROVAL /
DECLINATION NOTIFICATION
MISCELLANEOUS REQUISITION
& PURCHASE ORDER
SERVICE, MISCELLANEOUS &
TRAVEL REQUISITIONS
SPLITTING MATERIAL REQUISITION
FROM PRICING WINDOW
SPLITTING MATERIAL
REQUISITION
CHANGING MR TO SR &
CLOSING REQUISITION
PURCHASE ORDER STATUS ENTRY
/ VIEW
DELIVERY NOTE / GOODS OUT
FORM
CREATION OF NEW COMPONENT
GROUP & NEW VALUE FOR PROPERTY
INVENTORY REPORTS – SINGLE
ITEM
INVENTORY ANALYSISCARDEX,
STOCK CARD
ADDING COMPANYMENU * CRM – CONTACT
MAANGER
PURCHASE VOUCHER (INVOICED
PRICE)
PURCHASE VOUCHER (PURCHASE
EXPENSES)
FINANCIAL REPORTS – TRIAL BALANCE
OUT STANDING INVOICE
COMMENTS / DEBT COLLECTION
ORDER ACKNOWLEDGMENT – JOB
FILE
JOB TIME LOG / REPORT………………………………………………………………………………………………..122
'
Software Design
ERP is designed in such way that different user can
login into the system and work together in tandem to achieve the objectives and
goal of the company. This multi user environment helps the user to create
request/document and get approved or notified as and when its status changed
until got implemented.
Different user level / access rights are there
according to the role of the users. The front end / point of sale user can create
their own documents and save in the system. These documents will be routed/sent
thru different managerial personnel and finally get implemented.
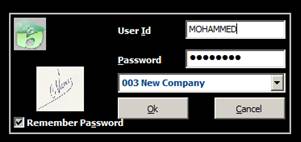
You will require a user id to log into the system. That
will be created and supplied to you by the administrator. The default password will
be mailed to the user and can be changed by the user. In the absence of
internal mailing facility at the company the default password will be blank and
the users will be prompted for password at the first log-in.
If you are on the LAN as of the ERP server, you can
access ERP by clicking ERP short cut available in your desktop.
WAN users can user terminal service client utility i.e.
Remote Desktop Connection. You will be able to access ERP login screen if you
have a user id and password registered in our server to connect with the server
thru terminal service
Once log into the system you can access and work upon
the various screen for which you have got access. Your access rights will be
set by the
After successful login,
users are allowed to select the ERP Menu according to the user rights.
Adding ERP users and setting their rights is an
administrative tool available in ERP, user manager
After login the
user can change the working company by
![]()
![]() FILE OPEN COMPANY
FILE OPEN COMPANY
![]()
ABOVE SHOWS THE ERP
MENU, EACH MENU GOT ITS OWN SUB MENU
USER CAN SELECT THE
REQUIRED MENU AND WORK ON IT.
Items in the tool
bar will help the user too quickly select the following items
Messenger, Delete
current message, chat, print, print using PDF writer
Copy , paste, calendar,
calculator, financial calculator, Spell check, Reminder, Delete reminder, Recent menu, hot key
settings, word, excel, mail, internet explorer, erp settings , preview, Close
ERP
RightClick the
Close Icon on the tool bar to pop up a special administrative tool window for
ADMIN users.
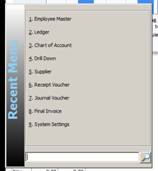
Press F12, it will
load the recent menu, that will help the user to select his recent menu.
 10 recent screens are readily available and
user can search for additional utilities of ERP in lookup by typing on the box.
10 recent screens are readily available and
user can search for additional utilities of ERP in lookup by typing on the box.
From the recent
menu user can type the item no to select the screen
The approval window
will be automatically loaded showing the documents need to be approved by the
user with details and approval history.
This window can be opened
manually by
![]()
![]() FILE OPEN DOCUMENT APPROVAL
FILE OPEN DOCUMENT APPROVAL
Declined documents are shown in Red.
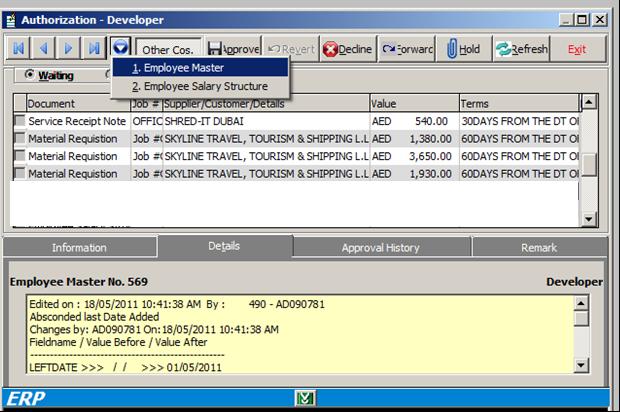
Remarks should be typed here for declining. Details of the selected document
User can view either the processed
or waiting documents for
approval. The default window will show the waiting documents for approval
Ø
The approved documents can be reverted by using Revert command button and vice versa.
For that user need to click the processed
button to view the processed document
Ø
The selected document can be approved, declined or forwarded to another authority with proper remark.
Ø
The approved item will disappear from the window. The
user can find it among the processed.
Ø
If not approved in 24 hours, the document will be forwarded
to the HOD of user.
This window will be loaded automatically for
every user. The user can view the status of his document by looking into this
window. The requisition (material/service) will be moving along various stages
and finally get vanished once the Material issue note/service receipt note made
against the requisition.
Ø New box contains Material/Service/Purchase
requisition raised by the user which are not priced
Ø
Ø
Ø
Ø The purchase order can
be created from an approved requisition. Then it will be in PO created section
Ø Once PO Printed it will
be moved to the PO printed section
Ø The user can take the
material out using the requisition no in the case of material requisition. Those
Material/ Purchase request against which material were not issued are shown in
the Mat. Not issued window.
Using the button user can view/print/mail/fax the documents and details

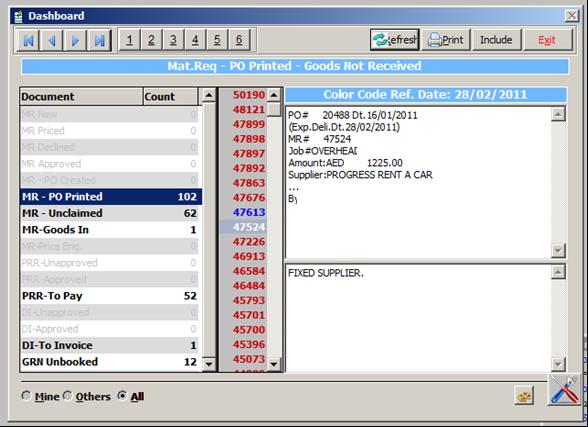
The user can
include other user documents also using this button

The users need to
take out the material from the store or cancel the requisition within a short
period of time. The content of the mat not issued window should be always
minimum.
For the purchase requests,
user has to wait for the GRN to be updated, for releasing the material
![]()
The user can preview the document by double clicking
over the nos.
The end user will get notified about the status of their documents thru
this window.

Documents with the
red background are the declined ones.

In addition to this
a popup also displayed to the user at the top, right hand corner of your
screen. This will be displayed for 30 seconds and vanishes. The same message is
showing in the status bar also. This will continue to display in every 1
minutes until you clear the message thru
messenger screen
Using:
TOOLS – MESSENGER
Besides this an
email also sent on daily basis with the details of documents approved.

Material Requests (Job/Asset/
![]()


![]() Available in
store
Available in
store
Convert into
Purchase request and moved to pricing . Material Issue, if job cost is under estimated
cost, otherwise need the approval from HOD
Yes No Partially
Available
Splitting into Purchase request and material
request after prompting the user for the same
![]()

Material Issue note Usually against stock/asset. If the purchase made
against STOCK, raise a separate MR to issue material against respective
job/asset Goods Receipt
note , stock updated upon approval for local purchase Stock updated upon landed cost computation. Purchase order Multiple Further
approval if the payment terms Advance ![]()
![]()
![]()
Pricing
and, approval (supplier id creation)
Delivery instruction, Delivery note, Gate passes all
against MR
Ø
Material Requisition from End user [
Either against job no, Stock or Asset
If all items available in store and the total MR value come
under the estimated job value, items can be issued from the store without any
approval.
If the accumulated job cost is more than estimated job value,
the MR required an approval for the material issue
Ø
If items not available if
partially available
![]()
![]()
Requisition converted into split
into MR (from store) and PR
(Purchase)
Purchase requisition and sent for pricing
Ø
The Purchase requisition can be against Stock/job or
asset. If it is against job no item will be reserved against the job no.
Ø
After pricing it will going for Approval of requestor,
HOD, FM , GM etc as per matrix
Ø
After the approval of pricing Purchase order can be
generated by purchaser.
Ø
Goods receipt note can be created against the purchase
order. This will also go for approval of requested person and quality
engineers. If got approved stock will be updated in case of local purchases. In
case of Overseas purchase (Currency other than AED) stock will be updated as
and when accounts people entered the invoiced price for the said GRN (Landed
cost computation).
Ø
The GRN creation will be notified to the requestor
Ø
Material issue against the request if request against
Job no. If the requisition was against stock a new MR has to be raised to issue
the item from the store against the required job no.
Ø
Delivery Instruction against the MR
Ø
Delivery Note against the Delivery instruction
Ø
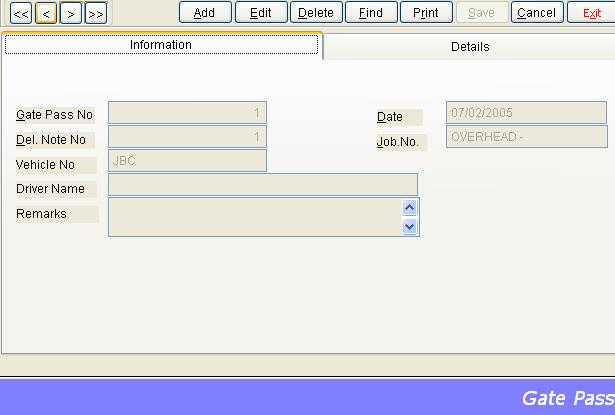
Gate pass if required against Delivery note
In case of Service requisition,
Service Receipt Note will be created.
1. Material
Requisition - For all type of inventory items
2. Service
Requisition - For all type of services
3. Miscellaneous
Requisition - For Confidential request,
4. Travel
requisition - For travel requests
![]()
![]()
![]() FILE NEW REQUISITION MATERIAL
FILE NEW REQUISITION MATERIAL
OR
![]() INVENTORY
MATERIAL REQUISITION
INVENTORY
MATERIAL REQUISITION
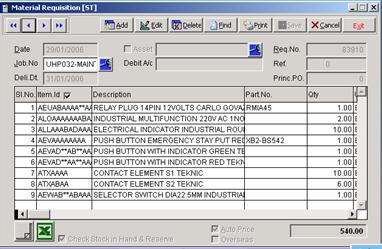
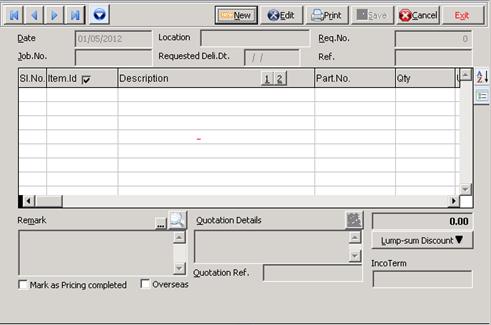
OPENING A REQUISITION
Ø
Click FIND, a look up will be displayed for searching
MRs created.
Ø
Enter request no and press Find now you will receive a window containing the requested job no,
username and requested date.
Ø
If you enter the job no all request against that job no
will be displayed.
Ø
We can extend our searching by entering combination of
fields like user name and requested date, job and user etc.
Ø
You can see all the requests by clicking find now without entering any data
E.g.: These are the requests raised by user shankar

Ø
User can edit the requisition by using the Edit button.
IF it is priced requisition, a provision is there only to enter a remark and
send it for approval without pricing again.
Otherwise it will be marked as a new requisition and will be available
for pricing again
Ø
User can navigate thru the request using the previous
and next button
Ø
User can delete his requisition
Ø
Click ADD for
raising a new request
Ø
A request should be either against a Job /asset / stock
Ø
Select the job no from the lookup. Start typing in the
job field will show you the lookup.
Ø
Asset group can be selected from the lookup by marking
the asset check box. For new asset use fixed asset master to create.
This is system
Generated Requisition No
Default debit A/c can
be changed, if the user wants to specify another by using the Debit A/c field.

User can select the
to be priced by (person)
Helpful for inter
division MR
If multiple cost centers, user has to specify the
respective amount against each job no, then only it will reflect in the cost
sheet.
This additional button help the user to pick the
predefined remarks for (By Air,Sea,Courier) or from previous requisitions. This
remark will be printed in the PO generated.
Moving right thru
the row using scroll bar, the other columns are
These details
are usually filled by the pricing people

![]()
Ø
User can use the create
from reference button to create an MR from an old MR reference, bill of
materials etc. To avoid the item from the old MR you can make the quantity as
zero. You can add more items to your requisition. Press down arrow to add new items
Ø
Start typing in the item Id User can select the items
thru Lookup. The look up will show the
item description. Refer the
Ø
Del Date is the expected delivery date of the goods.
Ø
For overseas
purchase check the overseas button at the bottom area of the screen
Ø
For selecting the unit (if multiple unit in item master) press the menu button near to the
ctrl-key of your keyboard and select the unit from lookup
Ø
Press down arrow
to make more items in your request. Initially 10 item can be entered
Ø
Click the Save
button to save your request. Your new request no will be displayed.
Ø
ERP will not save you requisition without sufficient
details.
Ø
The requisition details can be exported to Excel
Ø
The status will be displayed in status bar ( new,
priced, cancelled etc )
Ø
Once saved the pricing people get informed about this
request.
Ø
Start typing
with any character in the item id field the item lookup screen will be loaded and you can select your item
from the lookup
![]() REFER THE ITEM ID LOOKUP GUIDELINES
REFER THE ITEM ID LOOKUP GUIDELINES
Ø
To search the items with Part no Press space in the item id field
Miscellaneous Request is used for confidential
request.
The user having the
privilege to this screen can create miscellaneous request and price. After
approval the user can create purchaser order.
Miscellaneous
Purchase order has to be selected for creating miscellaneous
![]()
![]() FILE NEW
REQUISITIONS
– (SERVICE/MISC/TRAVEL)
FILE NEW
REQUISITIONS
– (SERVICE/MISC/TRAVEL)
OR
PAYROLL MISC REQUEST
![]()
![]() PAYROLL
TRAVEL REQUEST
PAYROLL
TRAVEL REQUEST
Ø Service requisition is
similar to material requisition but used for services. The user has to type the
description of the service. The service requisition should be priced by the
authorized persons. But Misc. and Travel requisitions are need to be priced by
the requestor himself.
Ø The Miscellaneous and
travel requisition shall also be entered thru this screen. These requisitions
are usually priced by the requestor himself. For that requestor has to go to
the pricing screen.
Ø You can type your
description in the description
column and the details can be entered by double clicking in the item details field.
The entries also includes the following

Ø
The user need to select a job no / Asset no against
which request he is making
Ø
If multiple cost centers, the user can mention them and
amount that has to be allocated against each job.
Ø
Create from ref can be used to make similar request
from an old request
Ø
Check the overseas checkbox for overseas requests
The request needs to be priced by Service request pricing. After Pricing
it will be going for approval as per the matrix defined. Once got approved the
user can raise the Purchase order
![]() PURCHASE MATERIAL
PRICING / SERVICE PRICING
PURCHASE MATERIAL
PRICING / SERVICE PRICING

1. Price
history 2. Supplier
price list
![]()

![]()

Ø
Select the New button for the lookup, type the
parameter for search.
Start typing
here with alphabets. The Lookup will show the list of existing suppliers.
For new supplier entry you have to go to Supplier Master. FILE – NEW - SUPPLIER This additional button help the user to pick the
predefined remarks for (By Air, Sea, Courier) or from previous requisitions.
This remark will be get printed in the
Ø
The pricing person should enter the required details.
If all the required information entered the yellow background will change to white.
Ø
The supplier name can be different for different items,
while creating
Ø
If all items are priced the system will mark this
requisition as priced and will send for approval according to the approval
matrix.
Ø
After pricing it will be informed to the requester.
Ø
![]() The pricing people need to enter the different quotation price and
respective supplier names
The pricing people need to enter the different quotation price and
respective supplier names
Ø
While pricing Requisition can
be split, press delete to remove the items over slno column. The deleted items
will be saved as a new request with status New ( Need to be priced again)
Ø
The last 5 purchase prices
will be showing in wait window when cursor reaches the price column. This will
help the user for pricing
Delete those items
to be in new requisition by positioning over the Sl no column in pricing
window. The deleted item will be saved as a new requisition
![]()
![]()
![]() File Open
Requisition
File Open
Requisition
 Requisition can be spitted using this
Screen. The user
can make the new
Requisition by
putting the value in
New qty field of
required items.
Pricing
enquiry for It ems
![]()
![]()
![]() File Open
Requisition Pricing enquiry
File Open
Requisition Pricing enquiry
User can use this
screen to know the purchase price of an item. The Pricing will get notified
while creating this. They will price it and the user can view the price. The
user will be got notified after pricing
For such
requisition Pricing can be done thru
![]()
![]()
![]() File Open
Requisition Pricing enquiry process
File Open
Requisition Pricing enquiry process
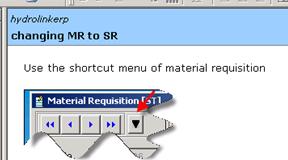
The short cut menu
in Material requisition screen can be used
To close the MR,
all the material reserved against this material
Will get unreserved
and merged to STOCK
Same menu can be used to convert an MR to SR
The
requester need to raise the MR with the job no of the division which will be
invoicing the end customer.
The
requestors can take any division material as if their own using MR against the
same job no (10% additional value of item will be charged, and will be deducted
from the division for all such interdivision material issues)
If
if is a purchase request for another division, the requisition need to enter the
purchaser name of the respective division.
The
purchaser should check the division of the
ERP Procedure need to followed by the
requisitioners for inter division purchase
The requisitioner can raise the purchase request
as usual against their job#
The requestor need to select the TO BE PRICED, name
from the Additional information button of MR screen if it has to be
processed by other division.
This MR will be available in the requisition
status window of both requestor and Pricing personnel. So both can keep track
of the status of the request
The approval matrix will be routed by checking the
requestor division instead of Job division, except for A division.
A requisitioner can raise any no of items
irrespective supplier in same requisition.
The pricing personnel will price the request
according to the quotation they received, so same requisition can contain
different suppliers.
While making
No need of creating or splitting the requests for
different supplier
If the pricing people need to split the
requisition for any reason
While
pricing Requisition can be split, press delete to remove the items from the
request. The deleted items will be saved as a new request with status New (Need
to be priced again)
(This can be useful for certain items which
need to be priced by others, inter division MR)
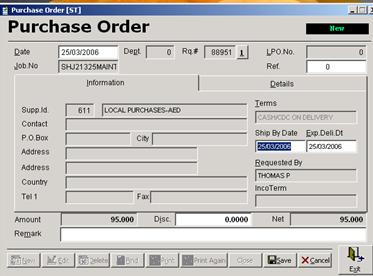
![]() PURCHASE PURCHASE
ORDER
PURCHASE PURCHASE
ORDER
 Click the New button; select the requisition from the lookup
Ø
Enter the Ship by Date and Expected Date of Delivery,
enter additional remark if any.
Ø
Click Save,
Ø
Click Print, (from the short cut menu Fax it , print
from the same menu, u will get original
Ø
For all subsequent printing use the print again option.
( The
§ You can enter req#
for creating § If Job# is entered
all req# against that job will be displayed and you can select your request § The user can extend
their searching by entering user name, request date or combining the above
field values § If request contain items from different supplier
ERP will prompt you to choose the supplier to whom you are making PO, and
make separate POs

Ø Different purchase order can be raised against single
request, if the pricing information contains different supplier names for
different items..
Ø The faxed
Ø While Deleting
Ø The purchase order created will go for approval again ,
if the terms are ADVANCE
Ø The user can close a
Ø The user can Fax the
Ø For miscellaneous purchase order, use the menu,
Payroll –
miscellaneous – purchase order
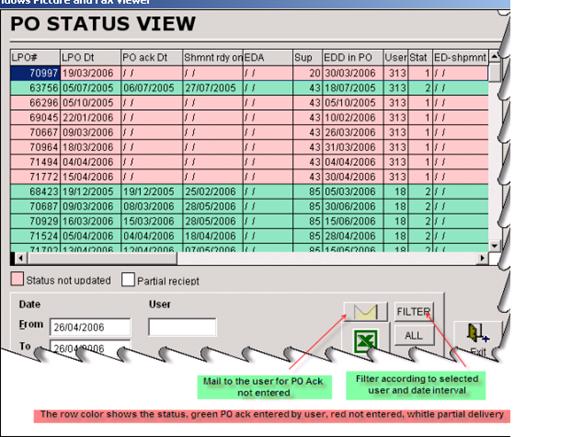
![]() PURCHASE
PURCHASE
Here, Green
Color shown purchaser entered the
The


![]()
Procedure for
entering
Purchaser
1. The Purchaser need to
entry the
Logistic coordinator
2. The Logistic
coordinator need to keep track of the entire acknowledged
Status view
3. The status can be
viewed in the status screen as shown above, for details press enter.
Once the purchase
order created and faxed/sent to the supplier, the user need to enter the
After
this the logistic coordinator will keep track of this
The user can view
the status of his
![]() PURCHASE
PURCHASE
Ø
This screen provide the user to update/view the latest status in
Ø
Whenever a
Ø
For entering the status use the ADD button and select/ enter the
Ø
The additional information regarding the shipment will
be entered into this window as and when new information received against this
Ø
To view the status use the FIND button and enter/select
the
For Viewing the
Enter the
![]()


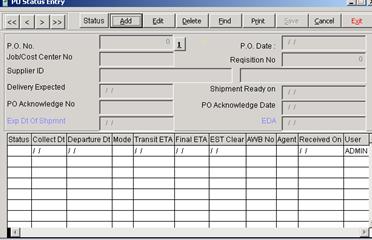
The logistic
coordinator needs to update these data, periodically
![]() INVENTORY GOODS
RECIEPT NOTE
INVENTORY GOODS
RECIEPT NOTE
Goods received are
entered thru this screen
Click ADD for new GRN entry
The GRN can be
created against a
You can view the
By
All local GRN
should be got updated automatically while saving GRN. The overseas
one will be updated after the accounts entry completion

Status new, stock
updated, updated (landed cost, overseas)
For finding
existing GRN click find and enter
your
GRN# and click find
new
Store/ branch need
to be selected while operating from branches
For direct delivery
GRN, The user should enter the sales invoice no, and it will go for
verification of Finance.
![]()
MIN for All direct
delivered material should be created immediately after the GRN approval.
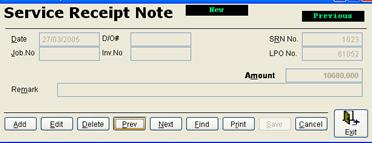
Similarly service
received can be entered thru the following screen
![]() INVENTROY SERVICE RECEIPT NOTE
INVENTROY SERVICE RECEIPT NOTE
SRN should be
entered against a job no. You can raise
any no of SRN against a LPO, each time the amount will be reduced. You can
raise the SRN only for the remaining amount
![]() INVENTROY
MATERIAL ISSUE NOTE
INVENTROY
MATERIAL ISSUE NOTE
Usually MIN
creating against a requisition, it can be against GRN,
Click ADD to create
an MIN (
For Manual entry
user need to select jobno/Asset no and other details.

Store/ branch need
to be selected while operating from branches
Click ADD to create
MIN (
Material issues
will be automatically get updated upon saving.
Use PRINT, to print
the material issue note,
![]() INVENTROY DELIVERY INSTRUCTION
INVENTROY DELIVERY INSTRUCTION
A delivery
instruction to be issued by the sales co coordinator to hand over the
material to either the customer or driver. Against the
delivery instruction, delivery note and gate pass can be generated
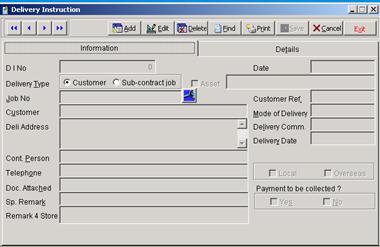
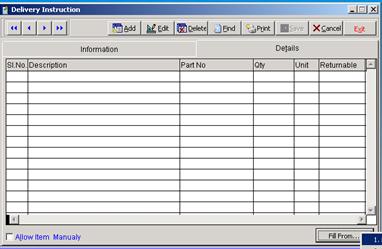
Ø
Details of the item can be entered into this screen
after pressing details button, The
details can be filled form the Material Issue note, purchase order,
Requisition, GRN etc
Ø
In the detail section the user can fill the details
from the details either form MR,
Ø
System will ask the user whether to create Goods out
form while saving the Deli Instruction.
Ø
![]() INVENTROY
Goods out Form
INVENTROY
Goods out Form


![]() INVENTORY
INVENTORY

![]() INVENTROY
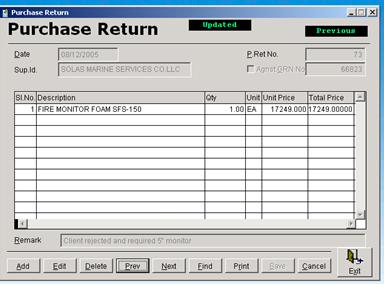
PURCHASE RETURN
INVENTROY
PURCHASE RETURN
After stock updating for making purchase return use this screen
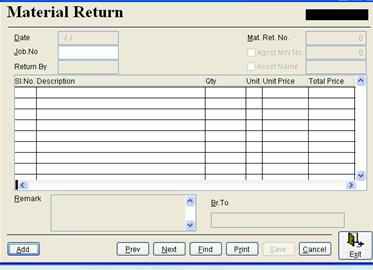
![]() INVENTROY MATERIAL RETURN
INVENTROY MATERIAL RETURN
Material issued to
a job can be returned, against the
issued job no. The user can create
material return note
The store manager
can update the Material Issue note upon receipt of item physically. Click the
find button it will show all the Material returns. Un updated once are without
amount.
ERP will ask for
update when the request is opened by the updating authority.
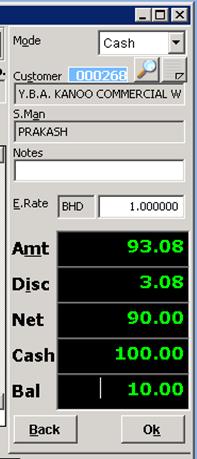
Inventory ---
Point of Sale
Ø The
user has to select store/branch from which he is operating. System will load
the Default value according to the user.
Ø
Ø  For lookup tick the check box in the Description header
Ø For
changing the units, in case of multiple unit items, press the shortcut menu key of your keyboard (The
key left to the control key).
Ø The
220% of landed cost will be displayed on the screen. User can enter the price
manually. For selecting pre fixed price use the shortcut menu key of your keyboard
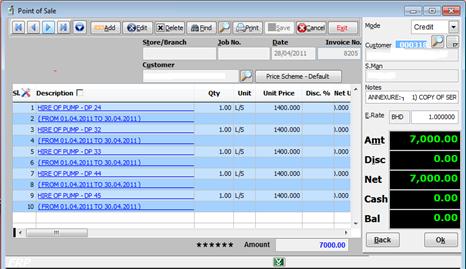
![]()

Click save button for entering more information


![]() Inventory Delivery note (inward)
Inventory Delivery note (inward)
This can be used
to enter the details of item received for service, rent etc.
The bar code of items can get printed using this screen. The items for
which barcode is needed can be loaded from material requisition, goods receipt
note, branch transfer note etc.
The user can also enter the items manually
![]()
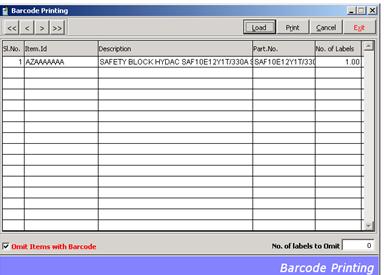
To use the portion of already printed label
![]()
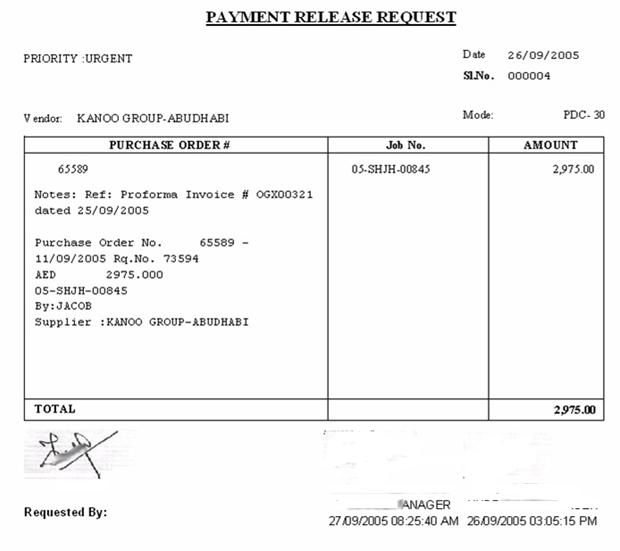
![]() ACCOUNTS MISCELLANEOUS PAYMENT RELEASE REQUISITION
ACCOUNTS MISCELLANEOUS PAYMENT RELEASE REQUISITION
This form can be used to create payment
release requisition and it will be sent for approval of HOD, FM, and GM as per
matrix. Make payment release request if the payment terms in
![]()
 Select the document type and enter the No
against which payment release requisition is making.
Select the document type and enter the No
against which payment release requisition is making.

m
Mode of payment
whether CASH, PDC, 60 days etc.

![]()
Details of purchase order will be displaying
here.
This requisition will be waiting for
approval in the approval window of concerned and it will go as per matrix to
higher authorities. You will be getting notification upon approval. You can
take a printout of approved requisition and can submit to Accounts for payment
release.
While making payment voucher,

![]()
![]()
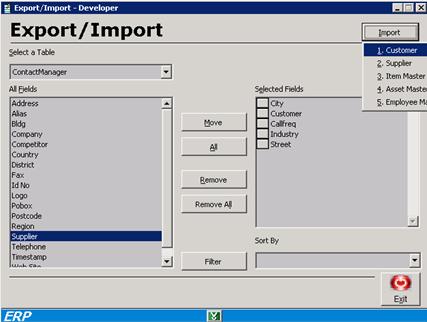
![]() File Export
File Export
Exporting ERP tables to Excel or Word, after selecting the required
Fields, this will help the user to create his own reports.
Master table can be imported from external data source like Excel sheets
using the Import wizard.
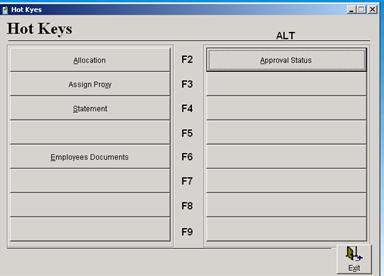
The user can set
his proxy using
![]() Tools Assign proxy
Tools Assign proxy
The system will
show the other users and he can select his proxy from the lookup
![]() Tools Send document (own)
Tools Send document (own)
Select the type of document from the combo box

 Enter the document no
 Select the authorities to whom the document
has to go
Select the authorities to whom the document
has to go
Click update
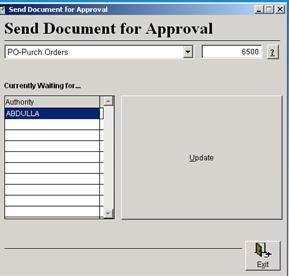
You can retain the current approval and send to higher authorities with
proper remark.

Job File / Opportunity Code / Cost center
![]()
![]() File New
Job (or Cost Center)
File New
Job (or Cost Center)


PROCEDURE FOR JOB
FILE CREATION ( USERS)
Ø
Job no (
Ø
The initial status will be E ( Enquiry), The user need
to enter the CRM customer name for making this job no
Ø
If CRM customer name is not exists, that has to be
created from the Contact Manager– Add option
Ø
Once the Order is confirmed, The user can change the status to O, using
the Edit option . The user need to
enter the other relevant information such as customer

Ø
If customer name not exists in customer master, user
need to create a customer in customer master
Ø
This job file will go for the approval of Finance
manager, Once approved the user will be got notified
 ADMINISTRATIVE
Can create Add/Edit
job without approval
Job can be deleted
if no document has generated against this job
ERP will generate
the list of documents prepared against the job
Job can be
cancelled by clicking over the Cancelled Check box
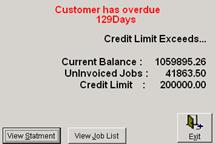
From the over due
information, approving authority can view the
Customer statement
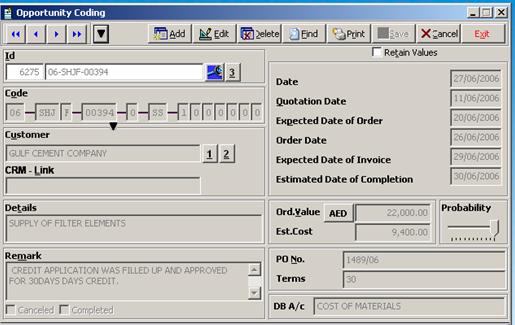
Every Job
undertaken by company needs to be coded. This can be done at different stages
like Enquiry, Budget, Quote, Order etc. Once created this will be used for all
future reference
Ø
Retain value button help user to enter similar job no
Ø
Customer statement / Avg. time for bill settlement can
be viewed using the short cut 2 & 1
Ø
Cost sheet can be viewed using short cut 3
Ø
The user can delete a job no if no records were passed
into that job, using any of the ERP modules.
Ø
The user can cancel a job if no cost incurred against
that job
![]()
YY DDDD
99999 X XX 9999999
YEAR DIV SEQ.NO STATUS OWNER PRODUCTS
![]()
![]()

This
can be automatically generated (as per div/year)
Location + Status
DIVISION – SHJ Sharjah E Enquiry
(Location Function) DXB Dubai R Regret
AUH Abu Dhabi
B Budget
BAH Bahrain Q Quote
DMM Saudi Arabia O Order
DOH
D Decline
L Lost Order
C Cancelled
X expire
V delivered
M completed
I Invoiced
S closed
Now Sequence No is
now entering manually. it is the job seq, no
In future it will
be system generated code
OWNER – Two letter
code to reflect the responsible person for the job. e.g.: MA for Mohammed Abdulla
PRODUCTS – 7 Digit
binary codes to represent the product category
![]() PLEASE REFER OPPORTUNITY CODING MANUAL OF YOUR ORGANISATION FOR DETAILS
PLEASE REFER OPPORTUNITY CODING MANUAL OF YOUR ORGANISATION FOR DETAILS
![]()
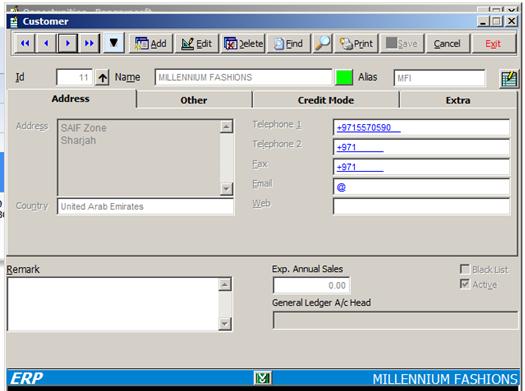
![]() FILE NEW CUSTOMER
FILE NEW CUSTOMER
Customer can be
created by user.
FM. Once approved
the customer will get activated.
Ø For Creating a new customer, Click the ADD button ,it will load a lookup of our company
database, from which select the company , the details will be loaded into
customer file. if company not exists company need to be created in contact
manager in CRM.
Ø The existing customer information can be edited with EDIT button
Ø  Use the button FIND to select the customer, whose information you need.
Ø Print –
for printing the customer details
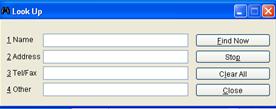
Ø Using the advanced
search button you can find your customer with the known information like
telephone no, web site address etc.
Short cut Menu [ Average time take for settling bill Customer statement Top customer list Division wise turn over Drafting a letter


You can view the detail of
existing customer with the navigation buttons also

![]()
![]()
 First Previous Next Last
![]()
Navigate button bar to navigate among
customers
Ø
Print – for printing the
customer details with approval information
Look up for the
advanced search of customers; here user can search with sub string of name,
address, tel/fax no etc.
The details of
customer should be entered as per the following rules
Ø
Country should be selected from the country lookup
Ø
Tele no prefix will be automatically loaded when
country selected, complete the entry by addition digits without hyphen or
special characters.
Ø
Email, Web address should be given. Email id is
mandatory.
Ø
In the Other
section contacting person, company salesman, industry sector, and currency
all from respective lookup should be entered.
Ø
In the credit
mode section the details of mode, credit limit days etc should be entered.
Entering Terms to Customer Master

Ø
Enter the mode here thru lookup, lookup will show all
the available term in terms master.
Ø
Enter the Credit limit days, Advance % etc here
Ø
In this example the terms save will be 30 days
from the date of invoice
After saving the
details the data will be going for approval. Once approved the customer will be
available in master as active customer.
The user can check
the approval information by searching the customer either thru find or record
positioning.
![]()
![]() FILE NEW Customer Category
FILE NEW Customer Category
Customer category
can be created here. This category can be selected while creating a customer.
![]()
![]() FILE NEW SUPPLIER
FILE NEW SUPPLIER
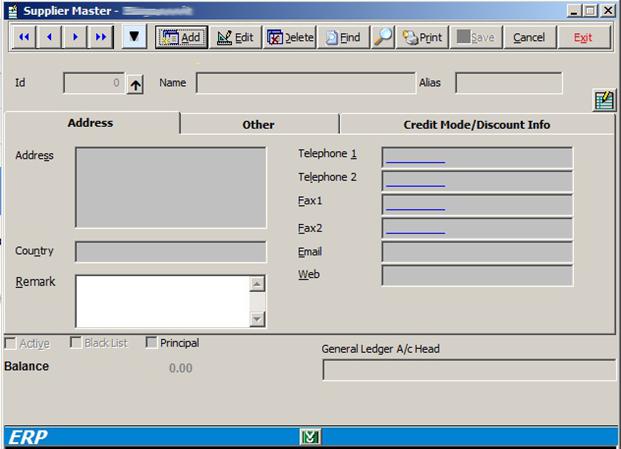
The new supplier Id
will be generated by the system. You
have to type the name of the supplier in the Name field thru the LOOK UP so
that the user can understand whether similar suppliers exist or not.
Ø
Care should be taken not to
duplicate suppliers with slight difference
![]()
![]() First Previous Next Last
First Previous Next Last
![]()
Navigate button bar to navigate among
suppliers
Ø
Find - for finding a supplier thru lookup
Ø
Print – for printing the
supplier details
The details of supplier should be entered as per the
following rules
Ø
Country should be selected from the country lookup
Ø
Tele no prefix will be automatically loaded when
country selected, complete the entry by addition digits without hyphen or
special characters.
Ø
Email, Web address should be given. Email id is
mandatory.
Ø
In the Other
section contacting person, currency all from respective lookup should be
entered. The bank details are
mandatory for foreign suppliers
Ø
In the credit
mode section the details of mode, credit limit days etc should be entered.
Entering terms in Supplier Master
![]() For the terms
For the terms
![]() Select the mode from lookup
Select the mode from lookup
Enter the days here
So the final term
will be
100% Advance
The user can mention
additional information in the Terms saved to Master
E.g.: 50% Advance 50% on delivery
Try to keep the format matched with the terms of terms
master.
The terms available are set up
thru the TERMSMAS table of ERP
The data will be saved and customer will be sent
automatically for approval
The user can check
the approval information by searching the customer either thru find or record
positioning.
![]()
![]() File New Supplier Category
File New Supplier Category
Different supplier
category can be created, and while creating the supplier this category can be
selected.
To effectively use the lookup and to avoid
code duplication in
STEP 1.
Ø
When you start typing the description of the item, the
lookup as shown below will show you the similar
words in our word library.
Ø
 You can select the word according to your choice by moving into it and
press enter.
You can select the word according to your choice by moving into it and
press enter.
Words starting
with STRU in our

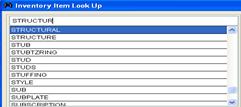
STEP 2.
Ø
Press space for the next word in your item description.
Now the lookup shows the existing items which contain the entered word. This will certainly help you to notice
whether your item is already there or can find the similar items.
Existing items
with the entered word select your choice

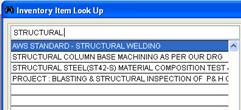
This view for selecting your item if it is there. Otherwise you can extend your search within
the selected items by typing any other word in your ITEM.
Repeating STEP1 and
STEP2 you can find your item.
Ø Search for your item
with the significant word in it. i.e. the
word which is unlikely to be present in other items. This will increase you
search speed substantially. The lookup
will show you the items consisting of your word.
Ø If you select the key
word which is unlikely to be in other items your searching will be much faster.


NOTE: - Intelligent
word selection while searching will help you to reach your item quickly. Please
go thru the following example.
ü The item look up
provide the following details
ü Description,
ü Stock quantity
ü Quantity reserved
against job
ü Qty arrived and stock
not updated
ü Branch quantity( user
can view the details by pressing the command
short cut 1)
ü Quantity in Requisition
and Quantity in Purchase order
E.g.:
If you want to select the item
BULLET
ASSY, SAPHIRE, 0.015”
To select press
enter after moving into it
![]() After typing a word you must
press space for ERP to process and off course you can type the next word
also after getting the items.
After typing a word you must
press space for ERP to process and off course you can type the next word
also after getting the items.
1. Start with BULLET press space only 6 records, and you can select the item
from the list 2. Start with ASSY press space; oh it’s taking time and a lot of records too

![]()
![]()

![]()

![]()
So make an intelligent word selection and
save your time.
If you start your search with BOLT it will
take time because there are a lot of bolts. But if you type HEX then it will
show only the word containing HEX, then you can type bolt. By adapting this
method we can limit the scope of search. So the user can increase the
efficiency of program by his intelligence.
NOTE: - You
can also find duplicate items
easily thru this lookup, note it and inform CONCERNED so that the duplicate
item can be removed from the ITEM MASTER.
![]()
![]() FILE NEW ITEM
FILE NEW ITEM
Since we have many problems with the duplicate items
ultimate care should be taken while creating a new item.
Ø Before creating a new
item user should ensure that the item or similar item is not present in the
system by the search utility.
Ø After ensuring the item
is not exists, select FILE – NEW – ITEM MASTER
Ø Select Add from the
item master window for creating new id.


![]()
![]()

Ø Put the make of item
here, you can select existing from lookup. If your make is new, type it in the
lookup window and press enter.
Ø Select the Main group
in which your item needs to be put like fitting,
valve, Denison etc. If the item does not come under any existing group,
you have to create a new group using the menu
INVENTROY – ITEMGROUP
Ø You can also fix the
MIN,MAX,REORDER LEVEL in this windows
Ø Extra unit of
measurement also can be given with factor value.
Example:
Steel material pipe - main unit of measurement is MTR
but it is available in market as length also. So you can put unit1 as LEN and
factor as 6 because 1 LEN = 6 MTR
While raising requisition you can specify the unit either
MTR or LEN
New It em
– Id
You will get the following window after pressing ADD
from the item master window
f
Adding property
to an existing component group For Editing the
group name, property heading or content For printing
the avlble component group and their properties


![]()
All items in our
Ø Similar components
having same properties are categorized to form a component group.
Example: All
adaptors whether straight, elbow 45, elbow 90 are coming under adaptor
component group
Sometimes the component names are similar and
properties are different in such cases another component group needs to be
created.
Example: Plug - for fitting
purpose
Electrical plug - for electrical purpose
So while searching you can come across different
component group and understand what are the existing similar component groups.
![]()
If you search with the word,
PLUG you can find different component group like plug, electrical plug, safety
plug etc
Ø So select the exact
component group in which you are going to created new ID.
Ø If you are unable to
select a proper component group from the available component group you have to
create a new component group.
Ø Make sure that your
item will not come under any of the available component group. For that you can
see the notes of this window for more information
Ø A same item can be
called in another name. In such cases the person who creates the group can
mention the other name in the notes area and that will help other users to
recognize his component group.
Example. In the
notes of adaptor group if we put this group
consists of adaptor, reducer, elbow etc it is helpful for a user who is
terming reducer for an adaptor with different end size.
Ø If the component group
is available you have to select the values from the existing properties group
of that component.
Example For
an ADAPTOR
You have to select type (whether straight, elbow 45, elbow
90 etc)
Size ( whether 1”BSPX2”NPT, 1”NPTX1”NPT etc
)
End type (whether MF, FM etc)
Ø Select the properties
according to your choice and after that press ACCEPT button.
If your property is not
available you have to create a new property.
Ø While creating new
property also care should be taken to avoid duplicates.
![]()
In the SIZE property 100MM is
there. Don’t create another with 4”
Avoid possible space while
entering 100MM instead of 100 MM
Ø For entering size of
adaptor always follow the alphabetic order of thread , if both are same the
small size should come first
3L, 10S, BSP, JIC, NPT etc in order
if both are BSP ¼”BSPX1/2”BSP should be the order
you have to change the Male, Female thread
also according to the change in thread
For searching or creating a
1. 1”NPTX2”BSP
MF adaptor use, 2”BSPX1”NPT
FM adaptor
2. 2”NPTX1”NPT MF
use 1”NPTX2”NPT
FM
3. 1”NPTX10S use 10SX1”NPT etc
Type your requirement in the lookup. If it is available
look up will show you. Other wise after completing the entry verify it for spelling and copy it.
Put *new in the lookup and
press enter
System will prompt you for the description, where you
paste the already copied text and save.
For property addition
Make sure that you are adding the properties with the
same fashion of the existing property
![]()
100MM already exists
do not create MM 80 OR 80 MM or 4”. create 80MM only
4” already there, do not create 5 INCH;
follow the pattern 5” only
always keep the existing format.
if you made a mistake you can use the EDIT button and
change.
For component group addition
After giving the component group name as described,
system will prompt you the no of properties of that component.
Put the numeral value there. 3
Then system will ask you for the property
headings. 1/3, 2/3, 3/3 etc
You have to put the header. For TYPE, PARTNO, MAKE
Or TYPE,
SIZE, THREAD etc.
![]()
Please
fix the properties with care so that all components comes under that category
can be specified. This needs some technical knowledge. So don’t hesitate to
check with the concerned technical person before creating the group.
Ø Then add the required
value within the properties as described above.
Ø You can also add
property to an existing group if required.
Ø Don’t try to fit all
information within the existing property group. Information pertaining to that
field only required to enter there.
Ø Addition information
can be provided in the memo of material requisition.
Check list – It em
Id creation
Ø
Search the items before creating, and locate the
possible component group already available.
Ø
*new for creating a new component group or value among
property fields.
Ø
While creating component group system will ask you the
no of properties and the heading for each property.
Ø Seek help of a
technical person for fixing property of a component group
Ø Put necessary notes for
the component group in ADD window.
Ø Add the properties by
typing *new in the property lookup window.
Ø
Keep the format of the existing values while adding
properties.
Ø
Avoid possible spaces within property value.
Ø
Put the div, unit, part no, make and group in the item master window
Ø
Put notes for any additional information regarding the
item in the notes of item master window.

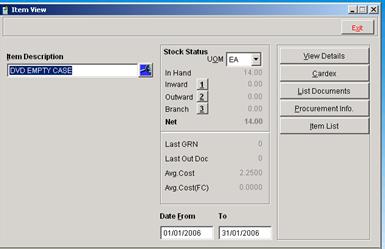
The details about
an item can be easily displayed thru the item lookup which is accessible by
typing over the item id field in various forms such material requisition,
purchase listing, item view etc
Start type the most
significant word in the item and press space, System will show all the item
having that word, user can extend the search scope by typing the other word
also
The figure shows
all the 60MM BOLT in the stock, scroll down to view the stock details
0000032033 Is the external
In the advanced
search you can include combination of words, words with special
characters etc. You can extend your
search also within part no, item
id etc. In the normal search ERP is
trying to locate words by excluding spaces and special characters.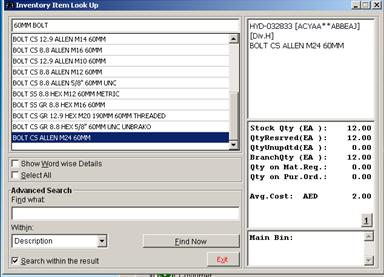
ü The item look up
provide the following details
ü Description,
ü Stock quantity
ü Quantity reserved
against job
ü Qty arrived and stock
not updated
ü Branch quantity( user
can view the details by pressing the command
short cut 1)
ü Quantity in
Requisitions and Quantity in Purchase
order
By pressing the command button 1 the user
will able to view the item view window , where more details can be accessed.
The same window can be accessed thru
Inventory Reports Inventory
Analysis
Outward
2 -
Will show the
requisition details by which this item got reserved, If urgent the user can
request those user to close their MR to unreserved the material and release it
for Material Issue.
Branch
3 - Will show the branches having the stock for this item
Requested
4 - Will show the purchase requisition no which are raised in
system and under processing
Ordered
5 - Will show the
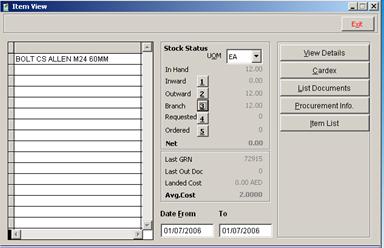
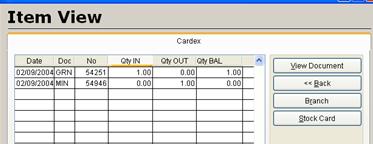
Cardex
will show the item in/out ,
Stock card will display the in/out priced

![]()
![]() BRANCH CARDEX
BRANCH CARDEX
View
document will show the
corresponding GRN, MIN,MRT,PRT etc
Print stock card will show the updated and
issued price over each transaction
Branch
will display the different
stock branches, select the branch will show the cardex of the item for that
particular branch
Invetory Reports It em
List
Inventory Reports
The reports can be
taken for different criteria.
ü
All Groups
ü
Group wise ( While creating an item the user is
selecting a group for an item like pump, motor, fitting, consumable etc). User
need to select the group from the lookup
ü
Division wise (While creating an item the user is
selecting a division to which the item belongs, general items are putting under
division G)
ü
Component group wise (While creating an item the user is
selecting a component group division to which the item belongs, such as adaptor
, bolt, vane pump , vane motor etc)
ü
Make wise
ü
Branch wise
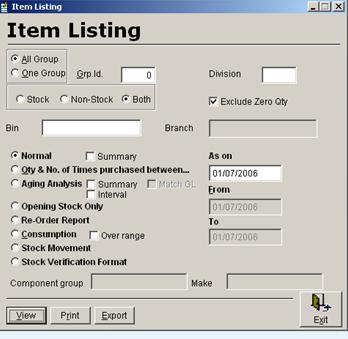
After
selecting the proper criteria various report can be generated
Aging
Analysis is aging report of
all items
Aging
Analysis summary will give
the group wise aging summary
Aging
Analysis Interval will give the items which are
purchased even when aged stock available, this need to be minimized.
Reorder
Report Will
give the items under re – order level / min level
Consumption will
show the consumption of the item within the given date range
Consumption
over range will show the
consumption over different days range( last 30,60 days etc)
Stock
Movement will give the group wise stock movement
within a date range
Stock
verification format For stock verification purpose
![]()
![]() ACCOUNTS REPORT FIXED ASSET LIST
ACCOUNTS REPORT FIXED ASSET LIST

Updates Opening
Values from Previous Year (Selected Year, Opening Values will be replaced with
Previous Year Closing Balance)
![]()
To be done only ONCE IN A YEAR after closing previous
year books
The details of
fixed assets with depreciation applied per month can be taken thru this report
screen
Inventory Analysis Cardex,
stock card
![]()
![]() REPORTS INVENTORY ANALYSIS
REPORTS INVENTORY ANALYSIS
§
Enter the from
and to date for the details
§
Select the item from the lookup for which you need the
information.
§ The details about
single item can be viewed using this windows

![]()
![]()

![]()
![]() PURCHASE REPORTS PURCHASE ORDER
PURCHASE REPORTS PURCHASE ORDER
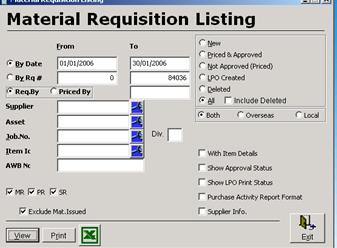
Reports can be
listed within from and To date
within
a range of request nos. OR
Within
a range of LPO no
Within the above
selection the view can be further limited by
The boxes can
be checked according to the requirement

![]()
![]() Inventory Reports Material Requisition Listing
Inventory Reports Material Requisition Listing
![]()
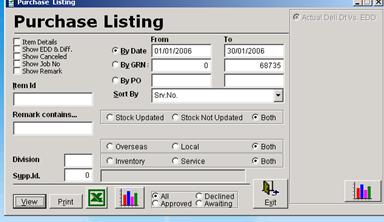
![]() Inventory Reports Purchase Listing
Inventory Reports Purchase Listing
![]()
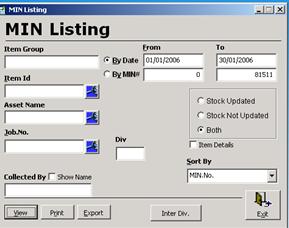
![]() Inventory Reports Material Issue Listing
Inventory Reports Material Issue Listing
![]()
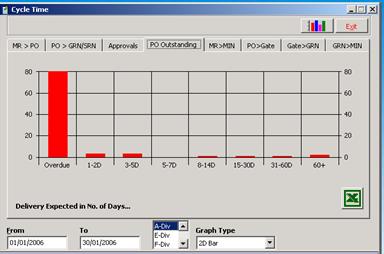
![]() Inventory Reports Cycle Time
Inventory Reports Cycle Time
![]()
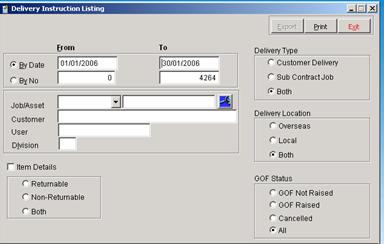
![]() Inventory Reports Delivery Instruction Listing
Inventory Reports Delivery Instruction Listing
![]()
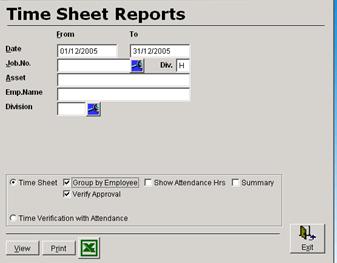
![]() Payroll Reports Time sheet
Payroll Reports Time sheet
![]()
![]() PAYROLL REPORT PAYROLL
PAYROLL REPORT PAYROLL

Ø
If you check the By
alias box payroll statement will be
displayed by alias name
Ø
You can choose either one of (Salary statement, Pay slip, Bank letter) at a time
Ø
Use the VIEW button to view the output
Ø
Use the print button to print the output
![]()
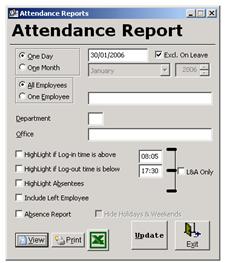
![]() PAYROLL REPORT Attendance
PAYROLL REPORT Attendance
![]()
![]() File Open Job
Details
File Open Job
Details

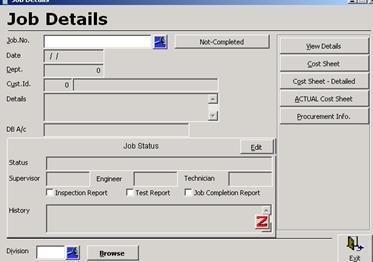
Cost sheet for a particular job is viewed thru this report window
Ø
Actual cost sheet provides the actual cost ( Material Issue
only Considered) and profit of the job
Ø
Cost sheet provide the
projected cost ( MR and
Ø
Cost sheet – Detailed provides item wise details of the Cost
sheet
All the job will be automatically closed after 30 days
from the first invoice against that job.
For marking the job as completed and not completed this button can be used.
![]()
![]() File
Open Job Card List
File
Open Job Card List
Details about the
Ø
Job of a division,
Ø
Job logged between a specific date range
Ø
Job related to a division etc can be viewed thru this
report
Job can be selected
thru the job lookup
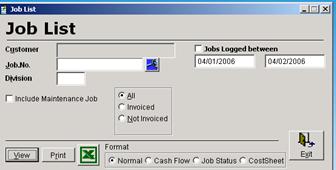
Ø
Job card list will provide the user details of Job
logged between a particular date range
Ø
The report can be taken division wise, Customer wise or
Job wise
Ø
Different formats are also available like normal, Cash
flow, Cost sheet etc.
Ø
Invoiced sales report can be taken by clicking the
invoiced radio button
Ø
The data can be exported to Excel thru the excel button
Ø
The invoiced list cotains the journal entries also

Customer relationship
management (CRM) provides organizations with technologies, business
applications, and best practices that help them sell, market, and service their
products and services.
The first thing you
find when looking into the world of Customer Relationship Management is the
number of different definitions in use today.
"CRM is the
business strategy that aims to understand, anticipate, manage and personalize
the needs of an organization's current and potential customers" -- PWC
Consulting
From this we can
learn that CRM is more than just a piece of software; CRM is a business
strategy, one that puts the customer at the heart of the business.
“That’s nothing new”
and you would be right. Good business people have always understood the
relationship between happy customers that come back again and again and
creating long term, sustainable profitability.
You just have to
think of the local shop owner who knew everyone of his customer’s names,
birthdays and particular ailments to prove that point. What is new is that
there now exists the technology to enable this customer-centricity on a much
larger scale.
The History of CRM
Following on from
Enterprise Resource Planning or ERP (the business strategy that promised to
automate the “back-office”), the term CRM was first coined in the mid-1990s.
CRM in those days referred to the software used to help businesses manage their
customer relationships. From sales force automation software (SFA) that focused
on customer contact management to integrated knowledge management solutions,
these were the early foundations of CRM.
The last couple
of years have seen the term broaden to encompass a more strategic approach and
the investment of billions of dollars worldwide into CRM solutions and services
has followed.
First Things First
Successful CRM
always starts with a business strategy, which drives change in the organization
and work processes, enabled by technology. The reverse rarely works.
The key here is
to create a truly Customer-Centric philosophy that touches every point and more
importantly every person in the company. From CSR to CEO everyone must live and
breathe customer focus for all of this to work.
CONTACT
MANAGER
CRM - CONTACT
MANAGER
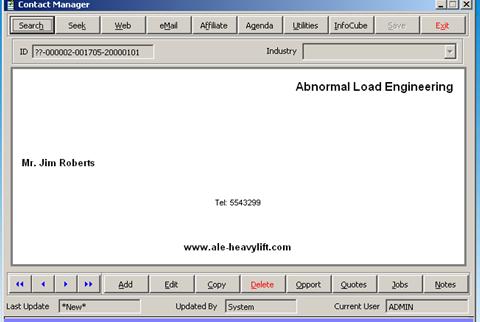
We have a Contact Manager, which can
be viewed as a business card
User can create their own business
card from for their contact; they can make it as private for ownership
Before creating user need to SEARCH / SEEK the company and
contact whether exists or not
Pressing space will load the look up of
company in the SEARCH
Search will help
to find out the contact with string / sub string known to the user. Type the
substring and press enter it will load all the contacts; using the navigation
button the user can position the exact contact. The search is like the Google search u can search of contact
name, company, email etc also combination of them.
For searching the user can use the
part of company name, phone no, email, contact
name or both company and contact etc. Searching should be done in intelligent
manner so that the user can reach the right person.
For eg
For
searching a contact in
Go for drydocks albo or drydocks Manual
After searching status windows shows
the no of records meeting the searching criteria. User can skip thru the
records using navigation buttons
If company exists use COPY to crate a new contact for
the same company. Company details will be loaded automatically
If company not exists user need toe
enter contact as well as company details using the ADD option
In side ADD, user can create more contacts with DUPLICATE (same company) and ADD (for new company)
Seek is normal lookup for finding the contacts
by contact, company name, phone no, address etc
Web will lead
to the web site of the contacts,
Email will help
to create email against the email address
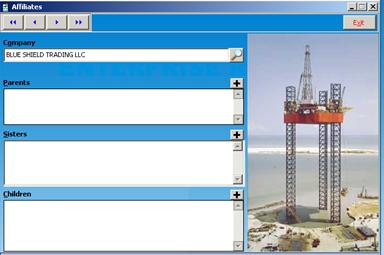
Affiliate will help
to associate the parent, children, and sisters of the company
Agenda is
putting the user to the agenda screen, where the user can fix the agenda (
appointments / tasks etc )
ADD will
provide a new screen to add a contact
Copy will
help to create a new contact for the existing company, loading all the default
information, after find the company click copy
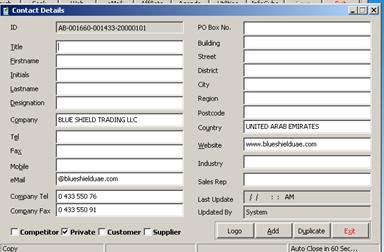
The
screen for Add/copy/edit, here user needs to enter all the information about
the contact
![]() Mr / Mrs
etc
Mr / Mrs
etc
Duplicate in the
add screen will provide the company details filled for adding another contact
Add help to
add more contact from the same screen without exiting from this screen.
Logo has to be
attached using the logo button ( ERP will provide the browsing window to select
the image which can be located anywhere in the network ( Size 250x100 pixel).
AFFILIATE Screen help to add the
parents/sisters/children for the selected company. Use + shortcut for adding.
If
u wants to remove, right click on the selected item and select delete
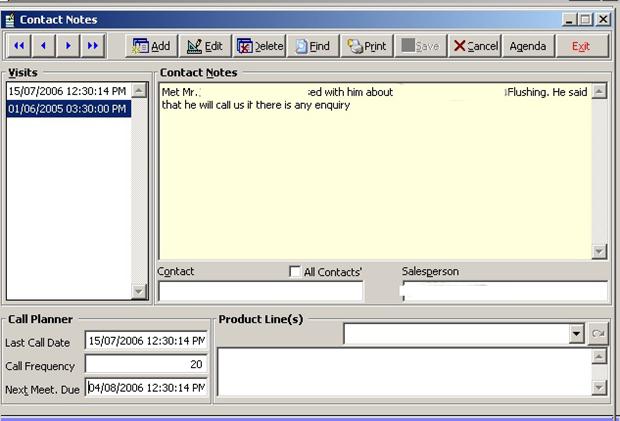
CONTACT
NOTES
Click
on NOTES to add notes for the
contacts CRM CONTACT
MANAGER NOTES
All
the contact notes of the selected salesman will be displayed in the window;
user will be the default sales man
The proxy user can
select the salesman name and view/enter data for him
Select
salesman if needed
ADD for
adding new contact notes, meeting date will be prompted
Product
line discussed need to be selected
Enter
the contact notes
Next
meeting date can be fixed using call frequency, if blank, 30 days will be taken
as default
While
saving the next meeting will be adding to AGENDA (task list) for that
particular user for that day.

Select the salesman
here to view
The contact notes
of others
For HOD’s
By default user name
is shown here
Click
on Call complete, to complete the visit. If not clicked next meeting date will
be put in the task list of the users Agenda, determined by last call date +
call frequency. If call frequency not mentioned by the user, 30 days will be taken
as default.
Print
option will give the option to print / review the contact notes
View the contact notes of
selected sales man , multiple salesman also can be selected
Print the call planner summary
Print the visit report
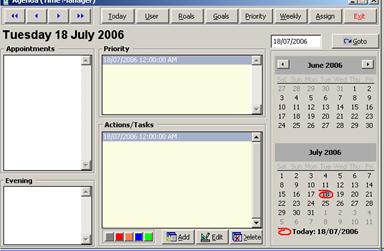
AGENDA
CRM - CONTACT
MANAGER - AGENDA
Agenda
shows the task and appointment of the selected user for a day. The agenda of a
user can be viewed by his superior as per organizational chart. The proxy user
can also view the agenda of another user.
Ø
Task can be added,
can be converted into appointment, and priority can be fixed using color coding
Ø
Task can be added
from the contact note screen also
Ø
User can
view/edit/delete the tasks ( ? history button shows , who assigned the task )
Ø
Details about the
task has to be entered, it can be edited also
Ø
So HOD can fix task
to the sub ordinates, user can view it and arrange their appointments
accordingly
Ø
Weekly agenda can be
viewed, click on weekly, to change
to day wise again click on weekly
Ø
If the appointment
after
High
priority set tasks RED color will be shown in the Priority window, Priority can
be refixed
Appointment
after
Priority
can be changed by clicking over the color tab after selecting the task.

![]()
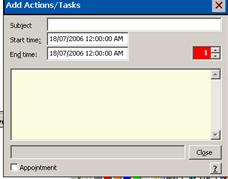
Click here to make
this task in appointment
Rec. history (helpful
to find who created this task)
The
completed task should be marked as Grey color.
The
task can be assigned to another user
Print will print the AGENDA of the selected user, in the following format
|
Agenda for Mohan |
|||||
|
From |
To |
Subject |
Details |
Priority |
Appointment |
|
|
|
Sales
visit |
Technical
discussion |
1 |
No |
|
|
/
/ : :
AM |
Meeting |
Mr.
Jules Sanderson@FRASER DIVING INTERNATIONAL LTD |
0 |
No |
|
|
|
Follow
up |
Offer
follow up |
3 |
Yes |
OPPORTUNITY RECORD
CRM -
Usually
this screen is loaded from a selected Contact, So it will load all the
Inside
this window, user can Filter the opportunity status wise, division wise, date
wise etc
o
Here the user can
view all the opportunities and respective details
o
Double click on
opportunity will load the opportunity
coding screen
o
Details can be viewed
in the right hand side window
o
All the
documents/designs related to this job will be displayed in the design factor
o
QSR provide the QSR
report for a particular period, divisional wise
o
Costing provide the
cost sheet for the selected opportunity
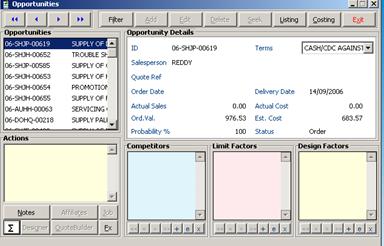
The
Zigma button gives sum of cost and sale
![]() Value of
the opportunity ( current view)
Value of
the opportunity ( current view)
Ø
Use filter to select
the records date wise, status wise, divisional wise etc
Ø
Double click to
select all status
Ø
Remove will release
all filters
Ø
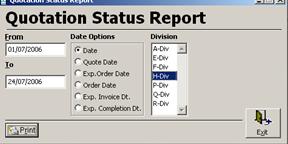
![]() The QSR
report available in QSR
The QSR
report available in QSR
For editing an opportunity of a particular
customer/contact
ü
Locate the contact
thru search/seek in Contact Manager
ü
Click the opportunity
, will load all the opportunity of the contact
ü
Locate the required
opportunity, the details will be shown in the right side window
ü
Double click on
opportunity, user will be placed in Opportunity Coding screen
ü
Press Edit, and change
the information
ü
All editing after
status O will be going for the approval of authorities, the user need to put
proper remark for the editing. Record history will be there for all the changes
made
ü
From the opportunity
Coding screen, the user can sent the ORDER
ACKNOWLEDGMENT, using the short cut keys. The file can be saved in user
desktop and send to the customer.
ü
The same file needs
to be attached to the DESIGN FACTORS,
of the opportunity in CRM. Once attached the user can remove the file from his
local computer.
ü
If the file name is ORDER
ACK,
ü
Similarly user can
attach the estimated cost sheet and
other relevant document in the Design Factor ( use + to add, x to remove ) ,
use the proper filename to recognize.
ü
If the user changing
the status to C or L, need to enter the
Limit factor
ü
Similarly if the name
of competitor known, that also need to be entered
ü
If status Changed to
L from Q, The user need to mention the Limiting factor as well as the
competition who win the quote
For
clearing Overdue list
1.
Locate the contact notes thru CRM contact manager
2.
Edit the Notes, and change the Call Frequency so that the next call will be a
future date
3.
If no need for a future visit, please mark it as call completed,then call freq
is not applicable and
save
CRM
REPORT
CRM CRM REPORTS
CALL REPORT
|
Call
Report (01/07/2006-30/07/2006) |
||
|
|
|
|
|
Date |
Contact |
Company |
|
MOHAN .J |
|
|
|
|
Mr.
koshy |
EMIRATES
BUILIDING SYSTEMS |
|
|
I had visited and
met the person. I had discussed in general. |
|
|
|
Mr.
Edwin Dlillas |
MARS
STEEL |
|
|
I
had visited and met the person. He said that the project will be finalized
next week also he was requested to quote cylinder mounting pads. |
|
|
|
Rashid
Hayat |
EXCEL
INDUSTRIAL CO LTD |
|
|
Visited
and the met the person. I agreed to much his budgeted price for each set
20,000 AED |
|
|
|
|
HAMBAKER |
|
|
I had visited and
met the person. Discussed in general, |
|
Activity Report
In
the call report
If
activity report check box clicked, the following report can be retrieved
|
Call
Activity Report (01/07/2006-15/08/2006) |
|||||
|
|
|
|
|
|
|
|
Salesperson |
Total Calls |
Avg.Calls/Day |
Avg.Calls/Week |
Calls/Order |
Calls/1000 AED |
|
SAMUEL |
13.00 |
0.29 |
2.02 |
24.00 |
0.02 |
|
MANAF |
6.00 |
0.13 |
0.93 |
14.00 |
0.02 |
|
MOHAN
.J |
20.00 |
0.44 |
3.11 |
12.00 |
0.12 |
|
KUMAR |
1.00 |
0.02 |
0.16 |
32.00 |
0.00 |
|
VISANTH
|
1.00 |
0.02 |
0.16 |
0.00 |
0.00 |
|
NOORAJ |
13.00 |
0.29 |
2.02 |
2.00 |
0.28 |
|
SAMY
RAM |
13.00 |
0.29 |
2.02 |
12.00 |
0.19 |
|
DARREN |
1.00 |
0.02 |
0.16 |
3.00 |
0.01 |
|
VIMAL |
14.00 |
0.31 |
2.18 |
11.00 |
0.49 |
|
SUBRA |
1.00 |
0.02 |
0.16 |
12.00 |
0.01 |
|
AHMAD
|
2.00 |
0.04 |
0.31 |
3.00 |
0.11 |
|
RAJEN |
13.00 |
0.29 |
2.02 |
1.00 |
6.50 |
Overdue/Late Visits Report
|
Overdue/Late
Visits as on |
||||
|
|
|
|
|
|
|
Call Due |
Days Late |
Contact |
Company |
Remark |
|
AHMAD (71) |
|
|
||
|
|
308 |
Mr
Hirmas |
N
S S C |
Overdue |
|
|
300 |
Mr
Rahman |
STAR
CEMENT |
Overdue |
|
|
245 |
Ms
Le Mis |
|
Overdue |
|
|
35 |
Mr
Ashraf Saad |
AL
AHILYA OIL FIELD DEVELOPMENT |
Late
Visit on |
|
RAJEN (74) |
|
|
||
|
|
130 |
|
KELLER
GRUNDBAU GMBH |
Overdue |
|
|
239 |
Mr.
Harish Bhat |
CLASSIC
EXTRUSIONS |
Overdue |
|
|
239 |
Mr.
Mukunda Bhandari |
AL
RAWAA GLASS & MIRROR FACTORY LTD. |
Overdue |
|
|
302 |
Dada |
TECHNOMECH
BUILDING INDUSTRIES |
Late
Visit on |
Forecast Report
|
Forecast
Opportunities (01/07/2006-30/07/2006) |
||||
|
|
|
|
|
|
|
Company |
Opp.Ref. |
Value |
GP |
GP% |
|
Mr. XYZ (35) |
|
|
|
|
|
ALBAWARDY |
06-SHJR-00465 |
600.00 |
300.00 |
100.00% |
|
Mr. ABC(37) |
|
|
|
|
|
VOLTAS
LIMITED |
06-SHJR-00464 |
85,000.00 |
35,000.00 |
70.00% |
|
Mr. PQR .J (43) |
|
|
|
|
|
ETA
- MECHANICAL LLC |
06-SHJH-00612 |
2,000.00 |
(4,000.00) |
(0.67)% |
|
NATAN(61) |
|
|
|
|
|
GECO
MECHANICAL & ELECTRICAL |
06-SHJF-00457 |
40,000.00 |
15,000.00 |
60.00% |
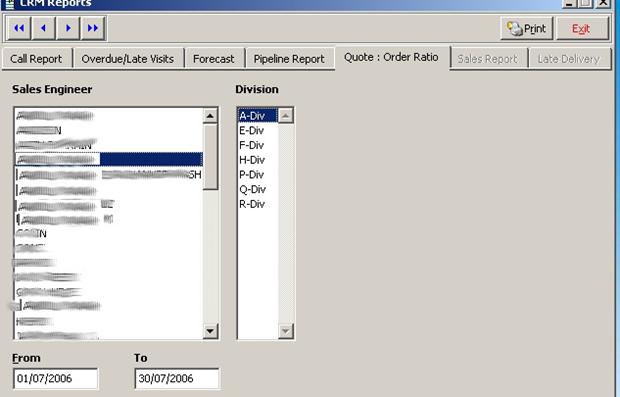
Quote Order Ratio
|
Quote:Order
Ratio (01/07/2006-30/07/2006) |
|||
|
|
|
|
|
|
Salesman |
Quotes |
Orders |
Ratio |
|
FERNANDEZ
(23) |
20 |
18 |
90.00% |
|
ABDUL
(35) |
14 |
3 |
21.43% |
Late Forecast Report (Order/Sales)
|
Late
Order Forecast Opportunities (01/08/2006-28/08/2006) |
||||||
|
|
|
|
|
|
|
|
|
Company |
Opp.Ref. |
Exp.Ord.Dt. |
Value |
GP |
GP% |
Status |
|
FERNANDEZ (23) |
|
|
|
|
|
|
|
NATIONAL
DRILLING COMPANY |
06-SHJH-00663 |
|
2,000.00 |
600.00 |
30.00% |
Q |
|
MARIDIVE
& OIL SERVICES |
06-SHJH-00034 |
|
660.00 |
297.00 |
45.00% |
Q |
|
LAMPRELL
|
06-SHJH-00709 |
|
0.00 |
0.00 |
0% |
E |
|
NATIONAL
OILWELL |
06-SHJH-00657.1 |
|
93,166.00 |
18,633.00 |
20.00% |
Q |
|
MANIAM (70) |
|
|
|
|
|
|
|
ADPF |
06-AUHH-00006 |
|
802,000.00 |
360,900.00 |
45.00% |
Q |
|
ADPF |
06-AUHH-00011 |
|
18,750.00 |
6,562.50 |
35.00% |
Q |
|
ADNATCO |
06-AUHH-00020 |
|
5,000.00 |
1,750.00 |
35.00% |
Q |
|
FUGRO
SURVEY ( MIDDLE EAST ) LTD |
06-AUHH-00022 |
|
30,000.00 |
10,500.00 |
35.00% |
Q |
|
MATRIX
CONSTRCUTION CO |
06-AUHH-00033 |
|
20,000.00 |
7,000.00 |
35.00% |
Q |
|
AL
JABER ENERGY SERVICES |
06-AUHH-00040 |
|
8,484.00 |
3,817.80 |
45.00% |
Q |
|
SPACEAGE |
06-AUHH-00070 |
|
20,000.00 |
7,000.00 |
35.00% |
Q |
|
EMIRATES
|
06-AUHH-00091 |
|
6,500.00 |
2,260.00 |
34.77% |
E |
|
Mr.XYZ(65) |
|
|
|
|
|
|
|
EMIRATES
TELE COMMUNICATION & MARINE SERVICES |
06-SHJH-00207 |
|
17,610.00 |
6,868.00 |
39.00% |
Q |
|
Mr.ABC(74) |
|
|
|
|
|
|
|
ATG
LTD HZC |
06-SHJH-00344.3 |
|
1,267,640.00 |
430,997.60 |
34.00% |
Q |
Sales Report
|
Sales Report
(01/08/2006-28/08/2006) |
||||
|
|
|
|
|
|
|
Invoice No. |
Amount |
Received |
Outstanding |
|
|
FERNANDEZ (23) |
|
|
||
|
17601 |
9,435.57 |
0.00 |
9,435.57 |
|
|
17609 |
37,947.80 |
0.00 |
37,947.80 |
|
|
17638 |
63,696.52 |
0.00 |
63,696.52 |
|
|
17649 |
10,345.73 |
0.00 |
10,345.73 |
|
|
17650 |
53,949.00 |
0.00 |
53,949.00 |
|
|
17665 |
63,696.52 |
0.00 |
63,696.52 |
|
|
17669 |
1,080.00 |
0.00 |
1,080.00 |
|
|
17675 |
10,554.92 |
0.00 |
10,554.92 |
|
|
17676 |
660.60 |
0.00 |
660.60 |
|
|
17678 |
57,731.84 |
5,773.18 |
51,958.66 |
|
|
17689 |
136,304.72 |
136,304.72 |
0.00 |
|
NOTES
All opportunities
created will be against a CRM Customer Id, available in our CRM master file
No approval
required for Status E,Q etc
If opportunity is
converting into Order, we need a valid customer Id in our customer master. Need
approval also
If valid customer
id not available, system will prompt it, and user need to create a customer id
in our customer master . The user can import the information from CRM master
while creating customer id
Owner can only
change the Job status
All job with status
O, if edited will go for approval again
While
selecting CRM customer in Opportunity record,
if
you found duplicate, (please merge those customer using the shortcut menu )
FOR
MERGING please contact IT Support or do as follows
1
Go to opportunity coding screen
2
click edit
3
select the original CRM customer thru lookup
4
click on shortcut
5
select merge company
6
select the company to merge to the master
7
repeat 5,6 till no more duplicates ( u need to refresh the lookup window for
removing the merged companies)

ü PAYROLL ENTRIES
ü TIME SHEET ENTRIES
ü ATTENDANCE ENTRIES
ü EMPLOYEE DOCUMENTS
ü EMPLOYEE RECORDS
]
![]() PAYROLL PAYROLL ENTRIES
PAYROLL PAYROLL ENTRIES
This windows is
used for entering any deduction in employee salary
STEPS
Ø
Select Month and
click the ADD button
Ø
Enter the deduction details by selecting employee from
the lookup.
Ø
Enter the
deduction details in the Deduction column.
![]() ERP will show the gen ledger
balance at the top right hand corner of your screen when you reach at the
deduction cell
ERP will show the gen ledger
balance at the top right hand corner of your screen when you reach at the
deduction cell
After completion of deduction entries of all employees
Ø
Click apply
overtime button.

Ø
If you want to add any more employee deduction detail
after loading the time sheet data , move to the a blank row at the end of
records and complete your entry by selecting
the employee from employee master.
Ø
Save your entries by clicking the SAVE button.
Ø
Now you can take the payroll statement of the month
![]() PAYROLL Timesheet
Entry
PAYROLL Timesheet
Entry
Time sheet entry
should be done by the co-ordinators, entries should be done within 10 days
Newly created/
edited timesheet will go for approval
If entry consists job no of other division, it will go
for the approval of other division HOD also, such entries where highlighted.
Ø
Click on add for adding new entry, entries has to be
make on daily basis
Ø
For editing find using navigation button and press edit
Ø
Select the employee name,job/asset form the lookup
Ø
Enter the other details
Ø
Save and can send for approval of HOD
Ø
The reports are available in Time sheet Reports (
PAYROOL – REPORT – TIMESHEET)
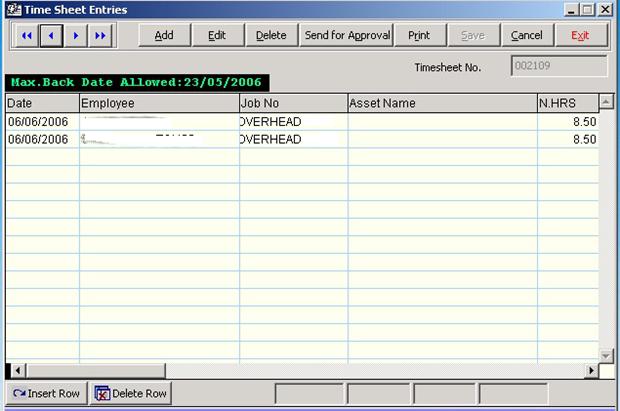
![]() PAYROLL Attendance
Register
PAYROLL Attendance
Register
The provision for
viewing and editing attendance register is available here.
Ø Find and select the Employee from the
lookup
Navigation
button bar will navigate you among employee records one by one
Ø Load
for loading the attendance register for editing
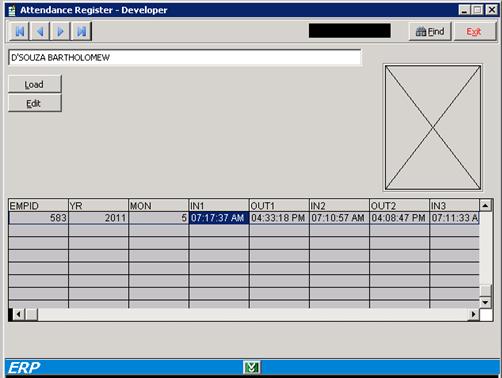
![]() PAYROLL Employee
Leave Record
PAYROLL Employee
Leave Record
The use can enter the Leave of employees here. This
will be reflected in various ERP reports
Ø Find and select the Employee from the
lookup
Ø Navigation
button bar will navigate you among employee records one by one
Ø Enter
the details and save
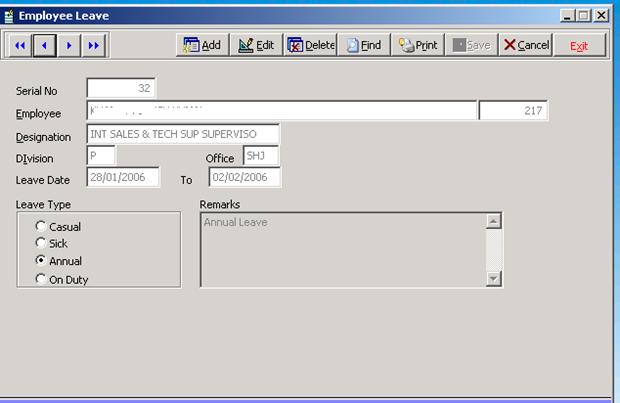
Payroll ---
Employee document
Ø Find and select the Employee from the
lookup
Ø Use
Add button to add the different document details of the Employee.
Ø  Navigation button bar will navigate you among employee
records one by one
Navigation button bar will navigate you among employee
records one by one
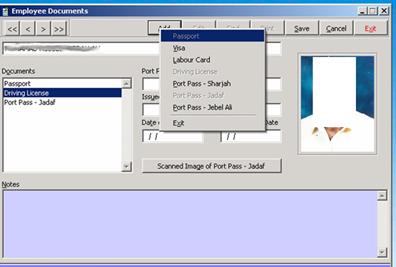

Additional notes can be entered in Notes window.

![]()
![]() File Open Approval Status
File Open Approval Status
Using the screen
Proxy the documents of an approving authority can be transferred to another.
Proxy of authority
can be set.
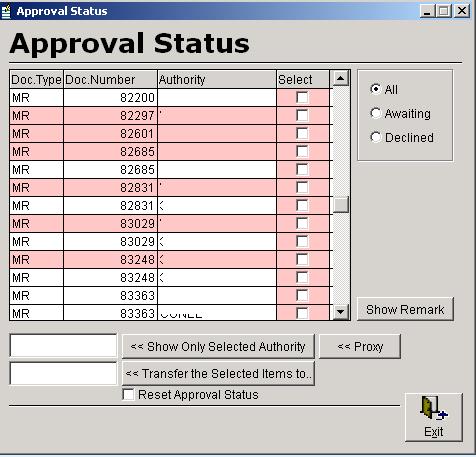
The authority can be transferred to another person
by typing here and press the command button next to this. This transfer can
make permanent checking the permanent
box. To reset the declined status to new while transferring authority check
the reset status box
![]() Tools Settings
Tools Settings
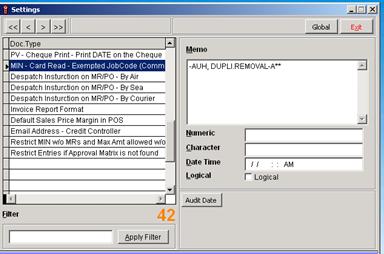
![]() Tools
Server
Tools
Server
ERP has to be
stared as *auto user in server and this application has to be started for
different automatic processing such as
o
Update job Cost
o
Notify Delayed Purchase Order
o
Birth day Notification etc
o
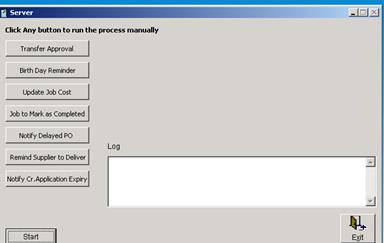
![]()
![]() File Open Approval Status
File Open Approval Status

Tools Bridging
![]()
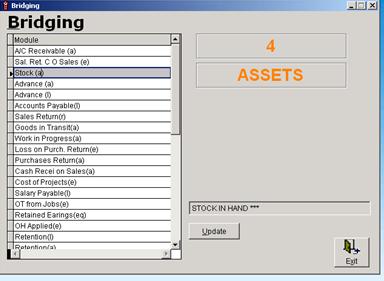
![]() Tools Log
report
Tools Log
report 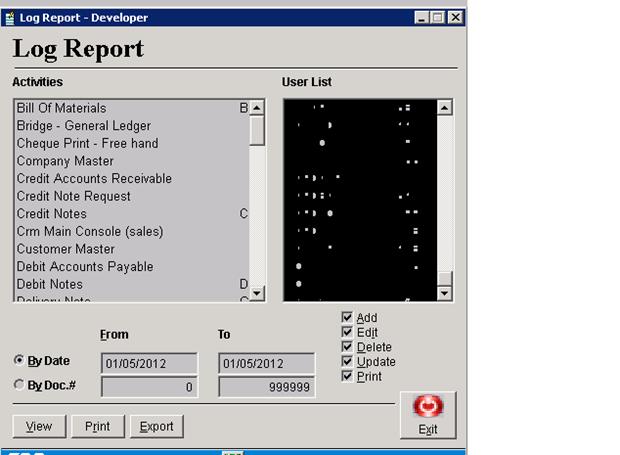

![]()
![]() ACCOUNTS
PURCHASE INVENTORY
PURCHASE
ACCOUNTS
PURCHASE INVENTORY
PURCHASE
Ø
Inventory purchase voucher can be created against an
approved GRN
Ø
Select your GRN no thru the FIND lookup OR give your GRN
no after clicking ADD
Ø
The previous
and next button help you to navigate
among the existing record


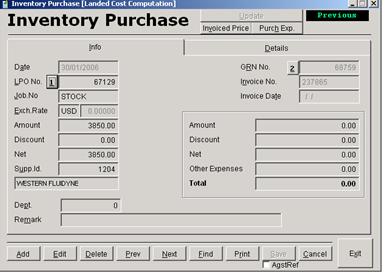
Inventory Purchase
voucher lookup help you to
Select the record
either thru GRN# ,
Supplier or ref
To allocate
against any ref. Keep this button check while updating
If there any price
difference in invoice with

Some times the two
or more GRN may be received against a
In such cases GRN
can be merged and purchase voucher can be created against the merged GRN .
Similarly if supplier send two or more invoices against a GRN , GRN can be split and against that the purchase voucher can be
prepared
The following
windows will help you to do that.
Ø
If there are more additional expenses incurred in this
, the detail can be entered in the purchase expense window shown below.
Ø
IF the amount is larger, the user should raise an MR to
meet the amendment in the
Ø
This window can be accessed thru Inventory purchase
![]()
![]() ACCOUNTS
PURCHASE SURVICE
PURCHASE
ACCOUNTS
PURCHASE SURVICE
PURCHASE
For the service
purchase voucher
The debit A/c
details can be entered in the third section
![]()
![]() ACCOUNTS
VOUCHER RECEIPT
ACCOUNTS
VOUCHER RECEIPT
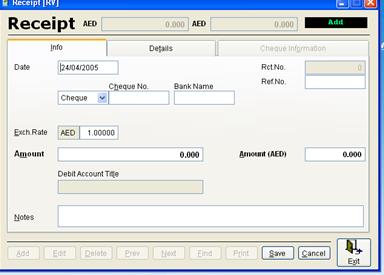
![]()
![]() ACCOUNTS
VOUCHER PAYMENT
ACCOUNTS
VOUCHER PAYMENT
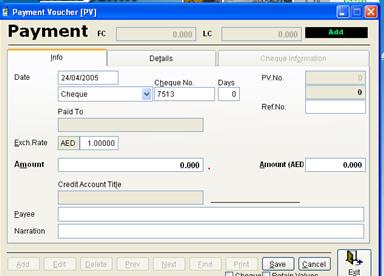
![]()
![]() ACCOUNTS
VOUCHER DEBIT
NOTE
ACCOUNTS
VOUCHER DEBIT
NOTE
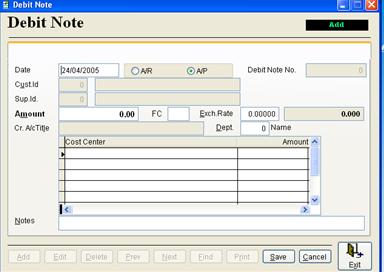
![]()
![]() ACCOUNTS
VOUCHER CREDIT
NOTE
ACCOUNTS
VOUCHER CREDIT
NOTE
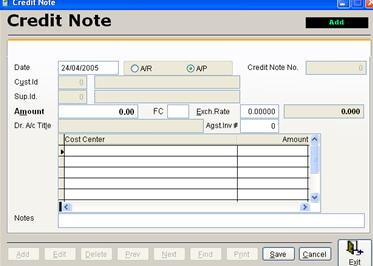
![]()
![]() ACCOUNTS
VOUCHER JOURNAL
ACCOUNTS
VOUCHER JOURNAL
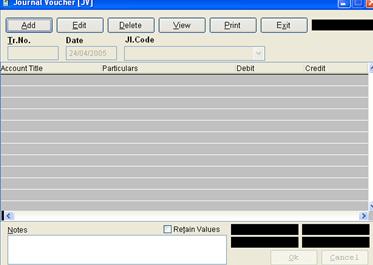
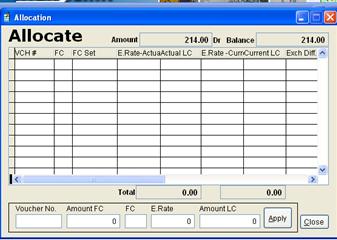
![]()
![]() ACCOUNTS
Invoice Draft
ACCOUNTS
Invoice Draft
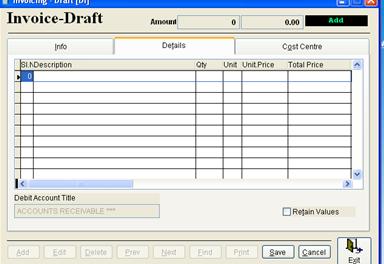
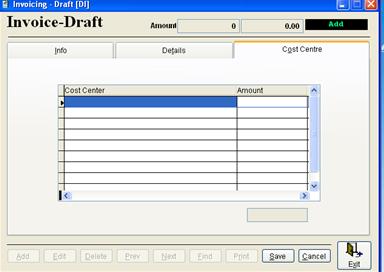
![]()
![]() ACCOUNTS
Invoice Performa
ACCOUNTS
Invoice Performa
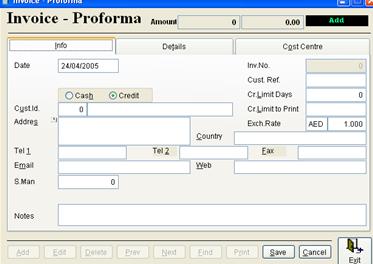
![]()
![]() ACCOUNTS
Invoice Final
ACCOUNTS
Invoice Final
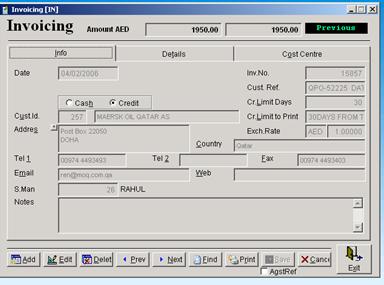
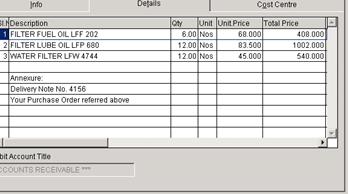
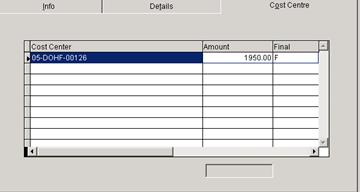
![]()
![]()
![]() ACCOUNTS
Reports Customer Customer Statement
ACCOUNTS
Reports Customer Customer Statement
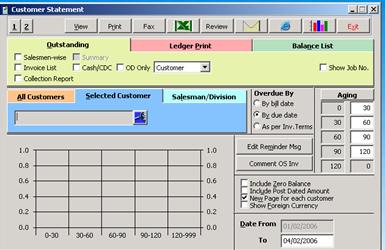
![]()
![]()
![]() ACCOUNTS
Reports Customer Top Customer
ACCOUNTS
Reports Customer Top Customer
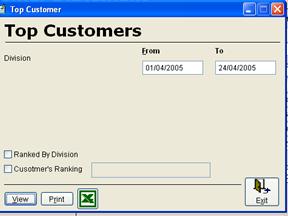
![]()
![]()
![]() ACCOUNTS
Reports Supplier Supplier Statement
ACCOUNTS
Reports Supplier Supplier Statement
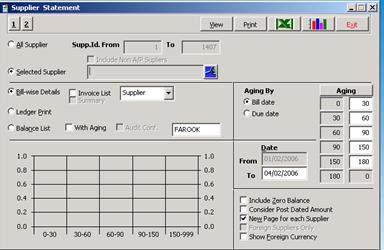
![]()
![]()
![]() ACCOUNTS
Reports Customer Customer Staement
ACCOUNTS
Reports Customer Customer Staement

ACCOUNTS Reports Ledger
print
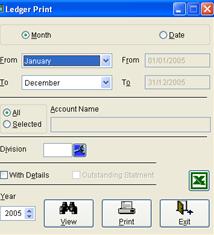
ACCOUNTS Reports Journal
Listing
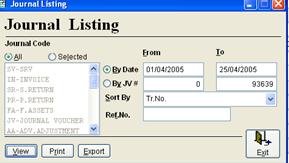
ACCOUNTS Reports Receipt
listing
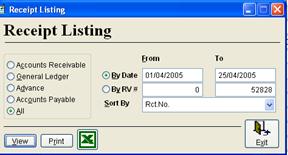
ACCOUNTS Reports Payment
Listing
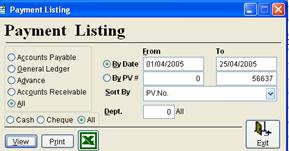
ACCOUNTS Reports Cheque
Listing
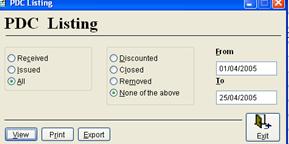
ACCOUNTS Reports Asset
list
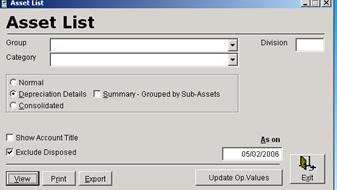
![]()
![]() ACCOUNTS
Financial Reports Trial Balance
ACCOUNTS
Financial Reports Trial Balance
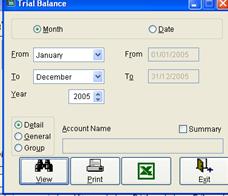
![]()
![]() ACCOUNTS
Financial Reports Profit and Loss Statement
ACCOUNTS
Financial Reports Profit and Loss Statement
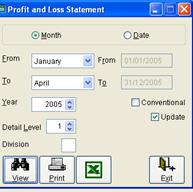
![]()
![]() ACCOUNTS
Financial Reports Balance
Sheet
ACCOUNTS
Financial Reports Balance
Sheet
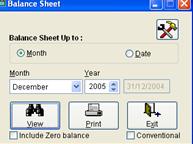
For keeping track of outstanding invoices and status of payment from the customer, this screen is used in ERP.
The
entered comments will be shown in the outstanding report that can be viewed and
reviewed by the management
The user needs to update the information regularly.
ACCOUNTS REPORT CUSTOMER CUSTOMER-STATEMENT
Select the required
customer from the customer statement
Click the button OS COMMENTS
U will
get the following screen

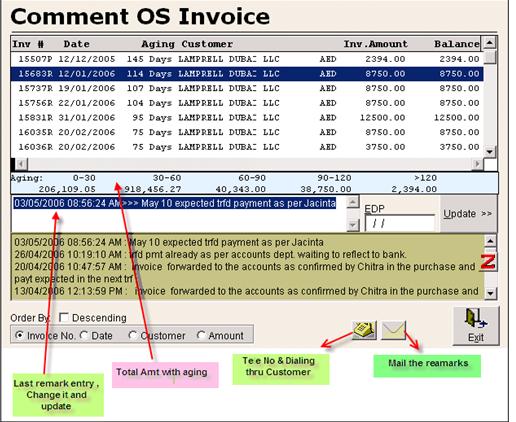
Ø
The recent remark will be highlighted, The user can
review it and act accordingly, if need to call the customer contacts will be
available thru the telephone shortcut
to the customer master
Ø
The aged outstanding details are shown in the
screen, After entering the comments
click UPDATE
Ø
Comments can be entered against each invoice, all
comments entered will be shown in screen ,
Order
acknowledgment can be sent thru ERP
File _ New
_ Job
From the
short cut menu select the send the
order acknowledgement. ERP will populate a word document having all relevant
information about the job, User can save it and
ORDER ACKNOWLEDGEMENT
|
Name of the Company |
: |
|
|
Email id. |
: |
|
|
Your |
: |
|
|
Kind Attn. |
: |
|
|
Our Ref.# |
: |
|
|
Sales Person |
: |
|
|
Contact No. |
: |
Dear Sir,
We thankfully
acknowledge your confirmation received on
|
No. |
|
Total Price |
|
1. |
Thanks & best
regards,

The following
master files need to setup for the working of ERP
o
Company For
opening a new company under ERP [ administrative]
o
User Manager For
managing the users of ERP [ administrative]
o
Chart of A/c Creating
/ modifying different Accounts
o
Fixed Asset Master Creating
Fixed Assets
o
Journal Code Code
of Journal
o
o
Department New
department/division under a company
o
Stores New
store under a company ( branch stores )
o
Customer Master Customers
o
Customer Category Category
of Customers
o
Supplier Master Suppliers
o
Supplier Category Category
of Suppliers
o
o
o
Employee Master Employee management
o
Salesman Master Salesman
User Manager Admin istrative
User manager has
three sections.
Users – Here you can Add/remove the users
Privileges- Here you can load the ERP menu and can set the privilege of each
submenu to
a selected
user. The Copy from option can be used
to copy all the privilege of a user to the currently selected user. Use update
to save your changes
Settings – Here setting like proxy, signature etc are possible
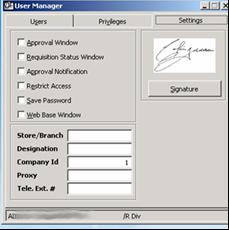
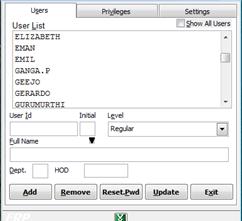
![]()
If the user has got
privileges of GRN / MIN his store/branch id should be selected here. He should
not make GRN/MIN in other stores.
A user can be blocked for accessing ERP by setting
restricted .t.
The user level must
be regular for the users except IT dept.
The approval,
approval notification, requisition status windows are some of the windows that
can be enabled/ disabled for the user. This will be set according to the user
level.
New Company Admin istraive
To setup a new
company in the ERP,
Use the FILE – NEW
– COMPANY option
Enter the details
of the company and save it. Verify &
Update should be used to update the recent developments in ERP tables and
data structure. For that you must be in the Sharjah Company, after selecting
the company using find, click verify and update. The additional fields and
indexes were generated by this.

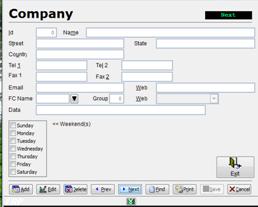
A folder has to
be created in the server to keep the ERP data of this company. That name
has to be specified
After the company
setup, all the master files like Chart of A/c, Customer, Supplier, and
Ø
Each company will be working in separate data
environment.
Ø
The user can log into their own company and work.
Ø
The approving authorities need
to start different session of ERP and periodically switch among sessions to
perform their duties
Trouble shooting
Copy the UAE folder
data files to the newly created folder and perform verify and update
All accounts in the
company should be created thru this screen
The main accounts
heads are classified as
Name Type A/c no starts with
ASSET G 1
LIABILITY G 2
EQUITY G 3
REVENUE G 4
EXPENDITURE G 5
The use can devise
his own Chart of A/c by arranging groups inside groups and individual account
(Type Detail) among groups.
Features
Ø
General and Details accounts can be created. Usually
details A/c are grouped under the General A/c. Usually entries are passed to
the details a/c.
Ø
A/c can be deleted ( if it is not at all affecting the
book of a/c )
Ø
The user can set the opening balance
Ø
The user can Rename the accounts
Ø
The accounts can me merged and by transferring one from
another and deactivating the later. For that rename the account with starting
letter *
The Chart of A/c can be viewed in sorted / Tree order.
![]()
But all the operation should be carried out
only in normal mode
Accounts groups
& subgroups
![]()
![]() FILE NEW FIXED ASSET
FILE NEW FIXED ASSET

Here the user can
create Fixed assets and set the depreciation percentage for the item with other
details such as category, div etc.
Date of purchase
and date of depreciation will be taken from the corresponding purchase bill of
the asset.
All the items under
a fixed asset having value more than 5000 are treated as sub asset.
![]()
![]() ACCOUNTS EPORT FIXED ASSET DISPOSAL
ACCOUNTS EPORT FIXED ASSET DISPOSAL
![]()
![]()
Fixed asset
disposal can be done thru this screen.
The difference
amount (Current value of asset (initial value - acc.dep.value) - selling price)
will be adjusted to LOSS/GAIN ON SALE OF FIXED ASSET A/c
For getting the
value of a fixed asset this screen can be used.
![]()
![]() ACCOUNTS EPORT FIXED ASSET LIST APPLY DEPPRECIATION
ACCOUNTS EPORT FIXED ASSET LIST APPLY DEPPRECIATION
Depreciation of
Fixed asset can be applied thru this module; it can be applied daily, weekly or
monthly.
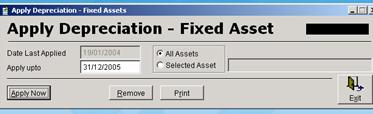
![]()
![]() File New Employee Master
File New Employee Master
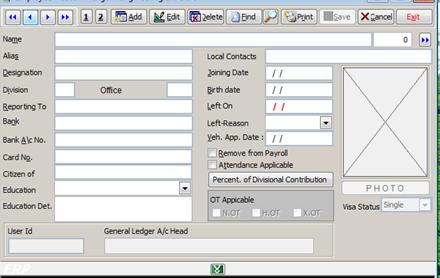

![]() Payroll Payroll
structure
Payroll Payroll
structure
![]()
![]() File New Salesman
File New Salesman
Salesman of company
should be registered here
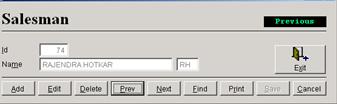
![]() Inventory
Inventory
New inventory group
can be made thru this screen
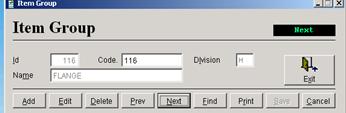
![]()
![]() File New Store
File New Store
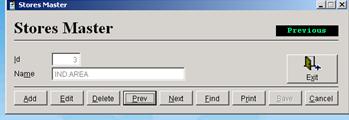
Department / Division
![]()
![]() File New Department
File New Department
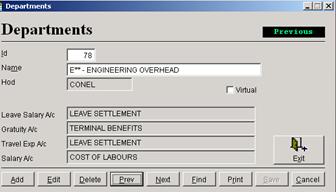
![]()
![]() File New Journal code
File New Journal code
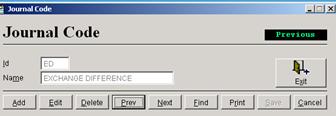
ACCOUNTS FIN REPORTS
DRILL DOWN
![]()
![]()
Ø
Select the Ledger A/c
Ø
Click for details over the document no bar
Ø
Double click for viewing the document
Ø
In the case of Bank reconciliation, Click OK for
verification marking, user can undo also
Ø
The user can view (verified / Not verified / All)
Ø
Save the markings with SAVE button
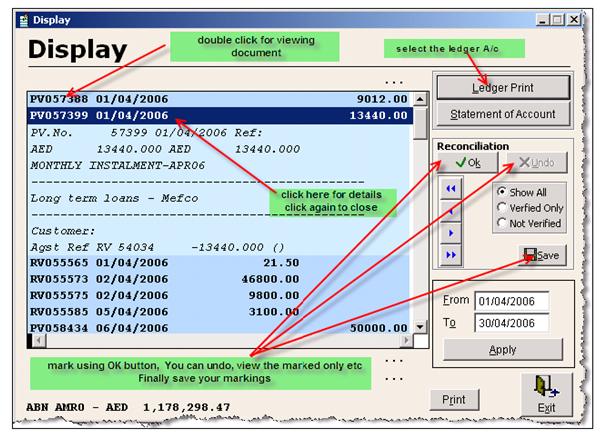
Customer
Satisfaction survey form is automatically sends to the Customer Email address
upon making of invoice (once in 6 months).
![]()
![]() FILE
NEW CUSTOMER
FILE
NEW CUSTOMER
Click the short cut
button OR click the short cut menu displayed on
the top right hand corner


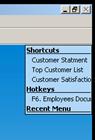
![]()
Select Customer
Satisfaction Survey
For sending a survey request
Select the
customer ( once in 6 months ERP is
automatically sending while making invoices)
Click on Send
For reviewing the response
Click Update, ( for
uploading recent updates from our web server to ERP), it will load all
responses
Select the customer, IF NO CUSTOMER SELECTED ALL
RESPONSES WILL BE DISPLAYED
Click on Refresh
Survey send date,
and by Responses received, double click to view
the response in excel

![]()
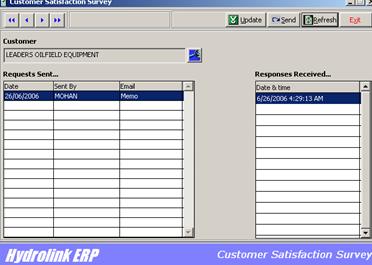
SURVEY SAMPLE FORMAT
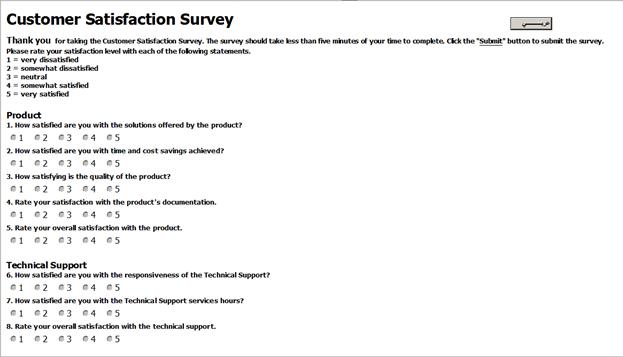
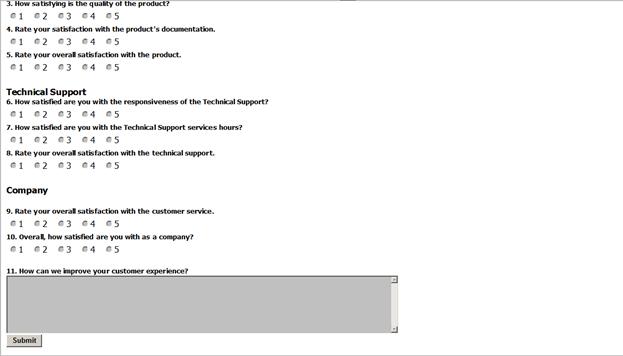
REVIEW RESULT SAMPLE
|
Customer Satisfaction Survey |
|
|
|
|
|
||||
|
By: CASH CUSTOMER
|
|
|
|||||||
|
|
|
|
|
|
|
|
|
|
|
|
Thank
you for taking the Customer Satisfaction Survey. The survey should take less
than five minutes of your time to complete. |
|||||||||
|
Click
the "Submit" button to submit the survey. |
|
|
|
|
|
||||
|
|
|
|
|
|
|
|
|
|
|
|
Please
rate your satisfaction level with each of the following statements. |
|
|
|
||||||
|
|
|
|
|
|
|
|
|
|
|
|
1
= very dissatisfied |
|
|
|
|
|
|
|
|
|
|
2
= somewhat dissatisfied |
|
|
|
|
|
|
|
||
|
3
= neutral |
|
|
|
|
|
|
|
|
|
|
4
= somewhat satisfied |
|
|
|
|
|
|
|
||
|
5
= very satisfied |
|
|
|
|
|
|
|
|
|
|
|
|
|
|
|
|
|
|
|
|
|
Product |
|
|
|
|
|
|
|
|
|
|
|
|
|
|
|
|
|
|
|
|
|
1.
How satisfied are you with the solutions offered by the product? |
|
|
|
|
|
||||
|
2.
How satisfied are you with time and cost savings achieved? |
|
|
|
|
|
||||
|
3.
How satisfying is the quality of the product? |
|
|
|
|
|
||||
|
4.
Rate your satisfaction with the product's documentation. |
|
|
|
|
|
||||
|
5.
Rate your overall satisfaction with the product. |
|
|
|
|
|
||||
|
|
|
|
|
|
|
|
|
|
|
|
Technical
Support |
|
|
|
|
|
|
|
|
|
|
|
|
|
|
|
|
|
|
|
|
|
6.
How satisfied are you with the responsiveness of the Technical Support? |
|
|
|
|
|
||||
|
7.
How satisfied are you with the Technical Support services hours? |
|
|
|
|
|
||||
|
8.
Rate your overall satisfaction with the technical support. |
|
|
|
|
|
||||
|
|
|
|
|
|
|
|
|
|
|
|
Company |
|
|
|
|
|
|
|
|
|
|
|
|
|
|
|
|
|
|
|
|
|
9.
Rate your overall satisfaction with the customer service. |
|
|
|
|
|
||||
|
10.
Overall, how satisfied are you with the company? |
|
|
|
|
|
||||
|
|
|
|
|
|
|
|
|
|
|
|
11.
How can we improve your customer experience? |
|
|
|
|
|||||
|
|
|||||||||
![]() For creating the work order Production work
order
For creating the work order Production work
order
User need to select
the job no / Asset from the lookup, (can search against job no, client,
details, customer
Task sequence,
select the numerical no starting from 1
Select the work
type against the task
Each task sequence
should be shown in different color in project plan
Delivery date in
the task sequence will help the user to find the variance date for delivery
Work order no will
be assigned by the system sequentially among each task
Feed the other
information and save.
The predecessor
will fix the predecessor of this work order by searching within the
task, within other task etc
Color code can be assigned to task using the color
pallete icon
Delete will help the
user to delete the current workorder / entire work order in the task
The user can take the work order print out, which will
show as below
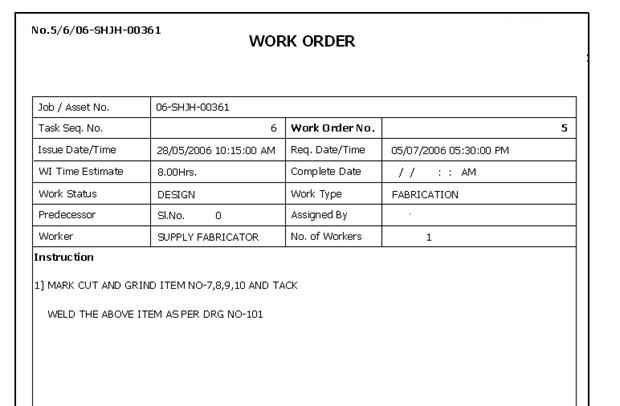
All the work order in job/project will help the system
to generate the production plan
This can be taken using the short cut 4
PRDUCTION – REPORT – WORK ORDER
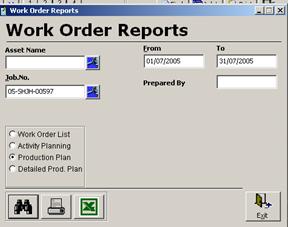
The production plan will give the user the task against all job for the date range
specified
The activity plan is the jobe wise chart, for the given
date range
Work order list will give the details of work order
issued
Detialed production plan is the jobwise report showing
the activities planned against that
SAMPLE PRODUCTION PLAN
|
Plan 01/07/2005-31/07/2005 |
|
|
|
|
|
|
|
|
|
|
|
|
|
|
|
|
|
|
|
|
|
|
|
|
|
|
|||||
|
Job/Asset |
1 |
2 |
3 |
4 |
5 |
6 |
7 |
8 |
9 |
10 |
11 |
12 |
13 |
14 |
15 |
16 |
17 |
18 |
19 |
20 |
21 |
22 |
23 |
24 |
25 |
26 |
27 |
28 |
29 |
30 |
31 |
|
CTS002-CYLINDER
TEST BED
|
|
8 |
8 |
|
|
|
|
|
|
|
|
|
|
|
|
|
|
|
|
|
|
|
|
|
8 |
8 |
4 |
|
|
|
|
|
04/07114HHS- ( |
|
|
|
|
|
|
|
|
|
|
|
|
|
8 |
|
|
|
|
|
|
|
|
|
|
|
|
|
|
|
|
|
|
04/08043HHD- (DUBAI CABLE COMPANY (PRIVATE) LIMITED) |
|
|
## |
4 |
8 |
25 |
8 |
|
|
|
|
|
|
2 |
|
|
|
|
|
|
|
|
|
|
|
|
|
|
|
|
|
|
04/09149HHD- (ONYX INDUSTRIES) |
8 |
|
|
|
|
|
|
|
|
|
|
|
|
|
|
|
|
|
|
|
|
|
|
|
|
|
|
|
|
|
|
|
05-AUHF-00007-O
(RAJAB TRADING COMPANY LLC) |
|
|
8 |
|
|
|
|
|
|
|
|
|
|
|
|
|
|
|
|
|
|
|
|
|
|
|
|
|
|
|
|
|
05-AUHH-00019-O
( |
|
24 |
|
8 |
12 |
|
1 |
|
1 |
|
|
|
|
|
|
|
|
|
|
|
|
|
|
|
|
|
|
|
|
|
|
|
05-SHJH-00019-O
(NOBLE DRILLING SERVICES) |
|
|
24 |
|
|
|
|
|
|
|
|
|
|
|
|
|
|
|
|
|
|
|
|
|
|
|
|
|
|
|
|
|
05-SHJH-00039-O
(CENTRAL ASIA) |
|
|
|
16 |
4 |
|
11 |
|
|
|
|
|
|
8 |
|
|
12 |
8 |
|
|
|
|
|
6 |
4 |
8 |
|
|
|
|
|
|
05-SHJH-00059-O
(AL JAZEERA FACTORY) |
8 |
8 |
8 |
8 |
|
15 |
38 |
|
|
36 |
|
|
|
24 |
8 |
|
10 |
|
|
|
|
|
5 |
13 |
8 |
8 |
16 |
|
|
8 |
|
|
05-SHJH-00065-O
(CASPIAN LTD) |
|
|
|
|
|
|
8 |
|
|
|
8 |
|
|
16 |
|
|
|
|
|
|
8 |
|
|
4 |
8 |
8 |
8 |
|
|
16 |
|
|
05-SHJH-00073-O
(HYDRAULIC DIV) |
|
8 |
|
|
8 |
4 |
|
|
|
|
|
|
|
16 |
|
|
|
|
|
|
|
|
|
2 |
12 |
4 |
4 |
2 |
|
|
|
|
05-SHJH-00151-O
(LAMPRELL |
|
8 |
8 |
8 |
16 |
16 |
25 |
|
|
4 |
|
|
|
|
|
|
|
6 |
|
|
|
|
|
12 |
4 |
4 |
8 |
|
|
|
|
|
05-SHJH-00307-O
(BAHRAIN WLL) |
|
|
|
|
|
8 |
|
|
|
|
|
|
|
|
|
|
|
|
|
|
|
|
|
|
|
|
|
|
|
|
|
|
05-SHJH-00380-O
(WEATHERFORD OIL TOOL MIDDLE EA) |
|
|
|
|
|
|
|
|
|
|
|
|
|
8 |
|
|
|
|
|
|
|
|
|
|
|
|
|
|
|
|
|
|
05-SHJH-00392-O
(CASPIAN LTD) |
|
8 |
4 |
16 |
32 |
|
|
|
|
|
|
|
|
8 |
|
|
|
|
|
|
|
|
|
|
|
|
|
|
|
|
|
|
05-SHJH-00424-O
(RENTAL) |
|
|
|
|
4 |
|
|
|
|
|
|
|
|
|
|
|
|
|
|
|
|
|
|
|
|
|
|
|
|
|
|
|
05-SHJH-00437-O
( |
|
8 |
|
|
|
|
|
|
|
|
|
|
|
|
|
|
|
|
|
|
|
|
|
|
|
|
|
|
|
|
|
|
05-SHJH-00494-O
(LAMPRELL |
|
8 |
|
|
|
|
|
|
|
|
|
|
|
|
|
|
|
|
|
|
|
|
|
|
|
|
|
|
|
|
|
|
05-SHJH-00581-O
(SUBTEC MIDDLE EAST) |
|
|
|
|
|
|
|
|
|
|
|
|
|
|
|
|
|
|
|
|
|
|
3 |
20 |
|
|
8 |
|
|
4 |
|
|
05-SHJH-00584-O
(RENTAL) |
|
|
|
|
|
16 |
|
|
|
|
|
|
|
|
|
|
|
|
|
|
|
|
|
|
|
|
|
|
|
|
|
|
05-SHJH-00623-O
(PRODUCTS DIVISION) |
|
|
|
|
|
|
|
|
|
11 |
|
|
|
2 |
|
|
|
|
|
|
|
|
|
4 |
|
|
|
|
|
|
|
|
05-SHJH-00625-O
(NOBLE INTERNATIONAL LTD) |
|
|
|
|
|
|
|
|
|
|
|
|
|
6 |
|
|
|
|
|
|
|
|
|
|
|
|
8 |
|
|
|
|
|
05-SHJH-00632-O
(FILTRATION DIV) |
|
|
|
|
|
|
|
|
|
|
|
|
|
8 |
|
|
|
|
|
|
|
|
|
|
|
|
|
|
|
|
|
|
05-SHJH-00674-O
(RENTAL) |
|
|
|
|
|
|
|
|
|
|
|
|
|
|
|
|
|
|
|
|
|
|
|
|
|
|
|
|
|
8 |
|
|
05-SHJH-00677-O
(RENTAL) |
|
|
|
|
|
|
|
|
|
|
|
|
|
|
|
|
|
|
|
|
|
|
|
|
8 |
8 |
16 |
|
|
8 |
|
|
05-SHJH-00699-O
(FILTRATION DIV) |
|
|
|
|
|
|
|
|
|
|
|
|
|
4 |
|
|
|
|
|
|
|
|
|
1 |
|
|
|
|
|
|
|
|
05-SHJH-00718-O
(KCA DEUTAG DRILLING GMBG) |
|
|
|
|
|
|
|
|
|
|
|
|
|
|
|
|
|
|
|
|
|
|
|
|
|
|
|
|
|
8 |
|
|
05-SHJH-00721-O
(RENTAL) |
|
|
|
|
|
|
|
|
|
|
|
|
|
|
|
|
|
|
|
|
|
|
|
|
|
|
|
4 |
|
|
|
|
05-SHJH-01182-O
(RENTAL) |
|
|
|
|
|
|
4 |
|
|
|
|
|
|
|
|
|
|
|
|
|
|
|
|
|
|
|
|
|
|
|
|
|
WORKSHOP
- HH**- |
|
8 |
24 |
32 |
20 |
16 |
|
|
|
|
|
|
|
|
|
|
|
|
|
|
|
|
|
|
|
|
|
|
|
|
|
|
0 |
16 |
88 |
## |
92 |
## |
## |
95 |
0 |
1 |
51 |
8 |
0 |
0 |
## |
8 |
8 |
22 |
22 |
0 |
0 |
8 |
0 |
8 |
75 |
63 |
56 |
## |
8 |
0 |
60 |
|
|
FABRIACTION
AND GENA |
|
|
|
|
|
|
|
|
|
|
|
|
|
|
|
|
|
|
|
|
|
|
|
|
|
|
|
|
|
|
|
|
FABRICATION |
|
|
|
|
|
|
|
|
|
|
|
|
|
|
|
|
|
|
|
|
|
|
|
|
|
|
|
|
|
|
|
|
FABRICATION
AND GENE |
|
|
|
|
|
|
|
|
|
|
|
|
|
|
|
|
|
|
|
|
|
|
|
|
|
|
|
|
|
|
|
|
FINAL
ASSEMBLY |
|
|
|
|
|
|
|
|
|
|
|
|
|
|
|
|
|
|
|
|
|
|
|
|
|
|
|
|
|
|
|
|
GENERAL
ASSEMBLY |
|
|
|
|
|
|
|
|
|
|
|
|
|
|
|
|
|
|
|
|
|
|
|
|
|
|
|
|
|
|
|
|
HYDRAULIC
PIPING |
|
|
|
|
|
|
|
|
|
|
|
|
|
|
|
|
|
|
|
|
|
|
|
|
|
|
|
|
|
|
|
|
PAINTING |
|
|
|
|
|
|
|
|
|
|
|
|
|
|
|
|
|
|
|
|
|
|
|
|
|
|
|
|
|
|
|
|
TESTING |
|
|
|
|
|
|
|
|
|
|
|
|
|
|
|
|
|
|
|
|
|
|
|
|
|
|
|
|
|
|
|
|
WELDING |
|
|
|
|
|
|
|
|
|
|
|
|
|
|
|
|
|
|
|
|
|
|
|
|
|
|
|
|
|
|
|
DETAILED
PROJECT PLAN
|
No. |
Task Name |
Duration |
Start |
Finish |
27 |
28 |
29 |
30 |
31 |
|
|
05-SHJH-00597- OVERHAUL OF JACKING SYSTEM AND CRANES ON RIG CD
1 |
24.00 |
|
|
|
|
|
|
|
|
Task 1 |
PAINTING |
24.00 |
|
|
|
|
|
|
|
|
1.10 |
1 Cylinder chipping |
8.00 |
|
|
|
|
|
|
|
|
1.20 |
1 Cylinder chipping |
8.00 |
|
|
|
|
|
|
|
|
1.30 |
1 Cylinder final painting |
4.00 |
|
|
|
|
|
|
|
|
1.40 |
1 Cylinder final painting |
4.00 |
|
|
|
|
|
|
|
WORK ORDER LIST
|
Sl.No. |
Job
No./Asset |
Issue
Date |
|
Work
Status |
Hours |
|
590 |
05-SHJH-00597
(SWIRE PRODUCTION SOLUTIONS) |
|
PAINTING |
PROGRESS |
8 |
|
597 |
05-SHJH-00597
(SWIRE PRODUCTION SOLUTIONS) |
|
PAINTING |
PROGRESS |
8 |
|
604 |
05-SHJH-00597
(SWIRE PRODUCTION SOLUTIONS) |
|
PAINTING |
PROGRESS |
4 |
|
605 |
05-SHJH-00597
(SWIRE PRODUCTION SOLUTIONS) |
|
PAINTING |
PROGRESS |
4 |
ACTIVITY PLAN
|
Plan 01/07/2005-31/07/2005 |
|
|
|
|
|
|
|
|
|
|
|
||||||||
|
Task Name |
1 |
2 |
3 |
4 |
5 |
6 |
7 |
8 |
9 |
10 |
11 |
12 |
13 |
14 |
15 |
16 |
17 |
18 |
19 |
|
|
|
|
|
|
|
|
|
|
|
|
|
|
|
|
|
|
|
|
|
|
FABRIACTION
AND GENA |
|
|
|
|
|
|
|
|
|
|
|
|
|
|
|
|
|
|
|
|
FABRICATION |
|
16 |
|
|
16 |
32 |
|
|
|
6 |
4 |
|
|
8 |
|
8 |
|
8 |
|
|
FABRICATION
AND GENE |
|
|
|
|
|
|
|
|
|
|
|
|
|
|
|
|
|
|
|
|
FINAL
ASSEMBLY |
|
24 |
40 |
24 |
|
|
|
|
|
|
|
|
|
40 |
8 |
|
8 |
8 |
|
|
GENERAL
ASSEMBLY |
8 |
16 |
32 |
44 |
40 |
36 |
57 |
|
1 |
25 |
4 |
|
|
14 |
|
|
8 |
|
|
|
HYDRAULIC
PIPING |
8 |
8 |
8 |
8 |
24 |
16 |
22 |
|
|
20 |
|
|
|
18 |
|
|
|
|
|
|
PAINTING |
|
8 |
12 |
16 |
16 |
8 |
16 |
|
|
|
|
|
|
30 |
|
|
6 |
6 |
|
|
TESTING |
|
16 |
|
|
|
|
|
|
|
|
|
|
|
|
|
|
|
|
|
|
WELDING |
|
|
## |
|
8 |
8 |
|
|
|
|
|
|
|
|
|
|
|
|
|
|
|
|
|
|
|
|
|
|
|
|
|
|
|
|
|
|
|
|
|
|
CREATE PROJECT FROM REFERENCE AND ADJUSTING DATE
Using short cut 2, the user can start new
job/project from an old reference.
User need to enter
the completion date,
System will provide
all the work order counting back from the delivery date
If any holiday
comes under such planning, the system can shift the date in the plan by
avoiding holiday. For that use the
shortcut 4.

WORKER HOUR LOADING
We can load the
available work hour of different type or workers using this page frame
Use + to add, - to
remove, and * to fill all date with a value
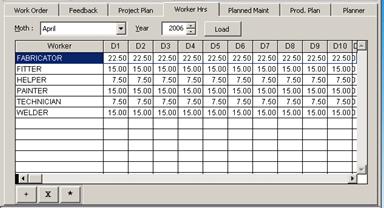
Production bill
of Material
![]()
BOM can
be created against job / quotation no.
Select the
If item not
available ,user need to create required item using item master
BOM can be exported
to excel using excel button
![]()
OPPORTUNITY CODING
The status of code
start from E (Enquiry) and it will be converting into Q (quoted), O (order
confirmed) etc . Once opportunity is logged in the system BOM can be prepared
and Quote accordingly
![]()
BOM / Drawings
![]()
PROJECT PLAN / WORK
ORDER
![]()
Order
processing (Material Request / Purchase
Request / Service Request )
JOB Time Log
Workers
need to login / logout their work time against each work order thru ERP
For
this
Select PRODUCTION JOB TIME LOG
Workers
need to scan the work order bar code printed on work order
Scan
the employee id card ( barcode )
if same employee scans against same work order again it will be treated as the
out time
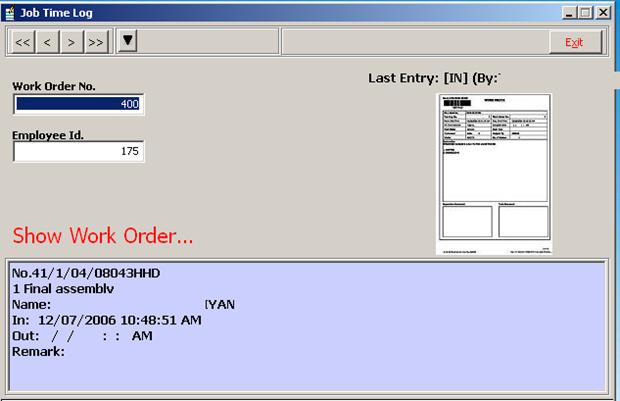
Job Time Log Reports
Thru the shortcut
menu, reports can be viewed
1.
Report
|
WOSLNO |
EMPLOYEE ID |
DT |
HRS |
NAME |
JOB NO |
|
2588 |
130 |
|
9.3333 |
ABC
|
05-SHJH-00362 |
|
2616 |
90 |
|
3.8228 |
XYZ
|
05-SHJH-00182 |
|
2616 |
90 |
|
0.0047 |
XYZ |
05-SHJH-00182 |
|
2618 |
90 |
|
3.3803 |
ABC |
05-SHJH-00182 |
|
2623 |
41 |
|
8.8247 |
PQR |
05-SHJH-00622 |
|
2621 |
104 |
|
8.8475 |
XYZ |
05-SHJH-00746 |
|
|
|
|
|
|
|
2.
Report with remark ( which is put by the user while log
out)
3.
list of work not signed out
Free hand cheque printing
In PAYMENT VOUCHER (Accounts / Voucher / Payment)
Right click over the Cheque check box and select free hand printing
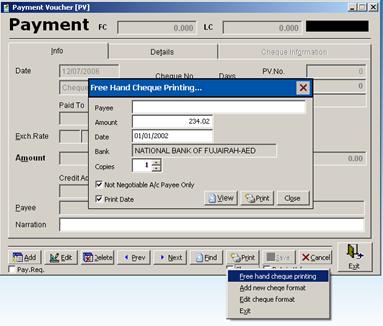
Enter the cheque
details
Predefined bank
cheque format can be selected
If new format
needed, contact IT for defining new format
Date will be incremented over a month for each
additional copy